Administration
Warning
🚧 Work in progress
This section is partly outdated and currently under active development and may change without notice. Content, examples, and screenshots may be incomplete or updated soon.
Admin actions for User model
Registered users will be listed on the Admin site. They need to be activated in order to log in, and will need project roles to be able to work on projects. All that and more can be achieved using admin actions, listed at the bottom left corner of User changelist admin view. Before running any action, select Users by marking checkboxes by usernames.
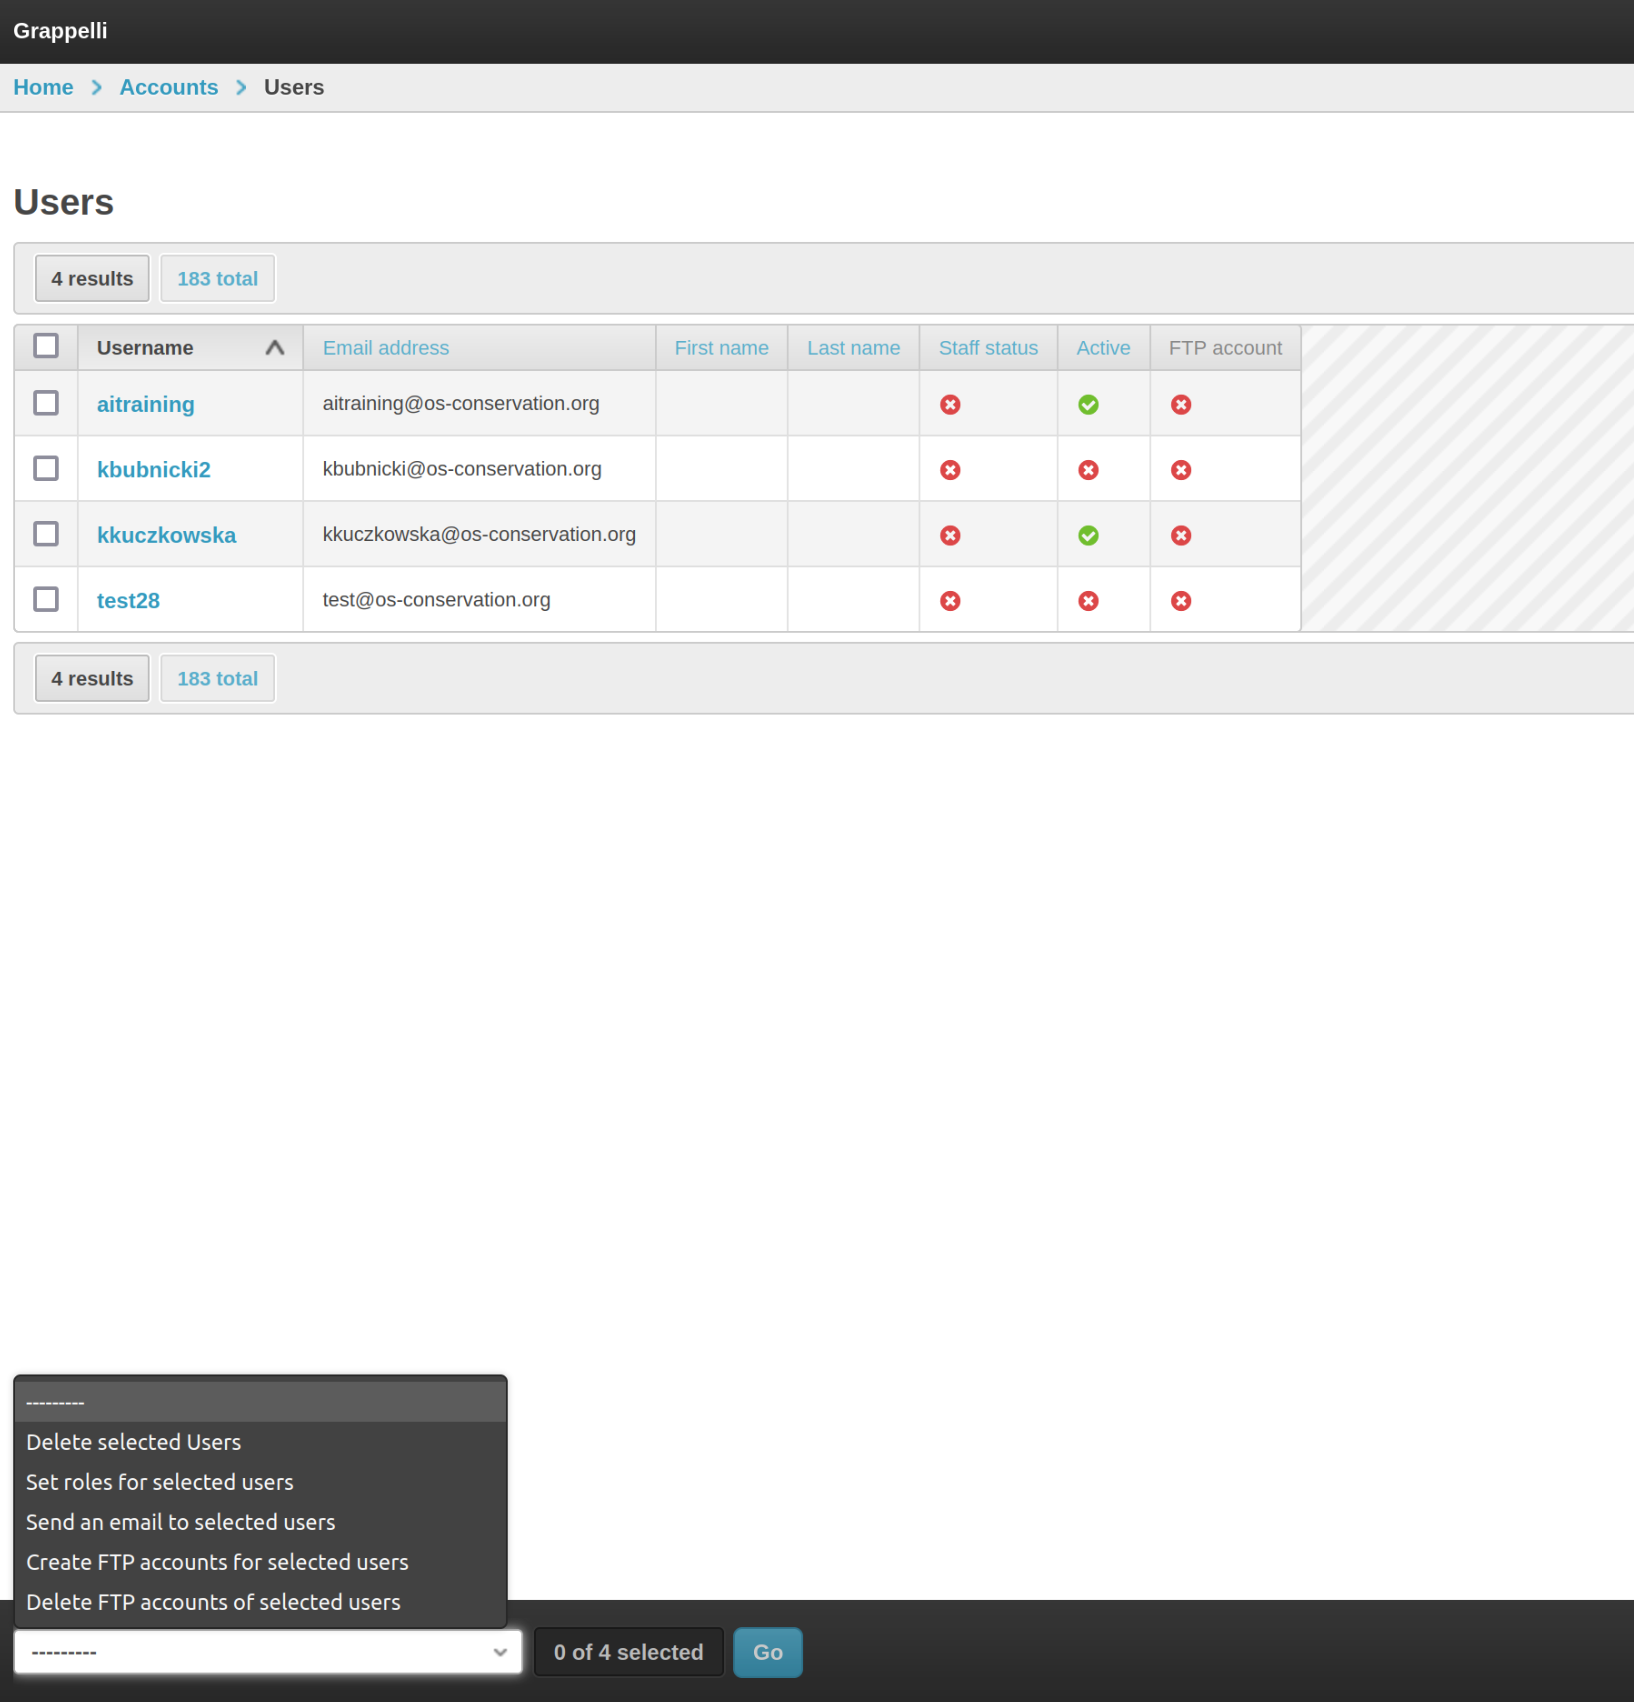
Set roles for selected users action
After selecting Users, action and clicking the blue Go button next to the action select, you will access the form.
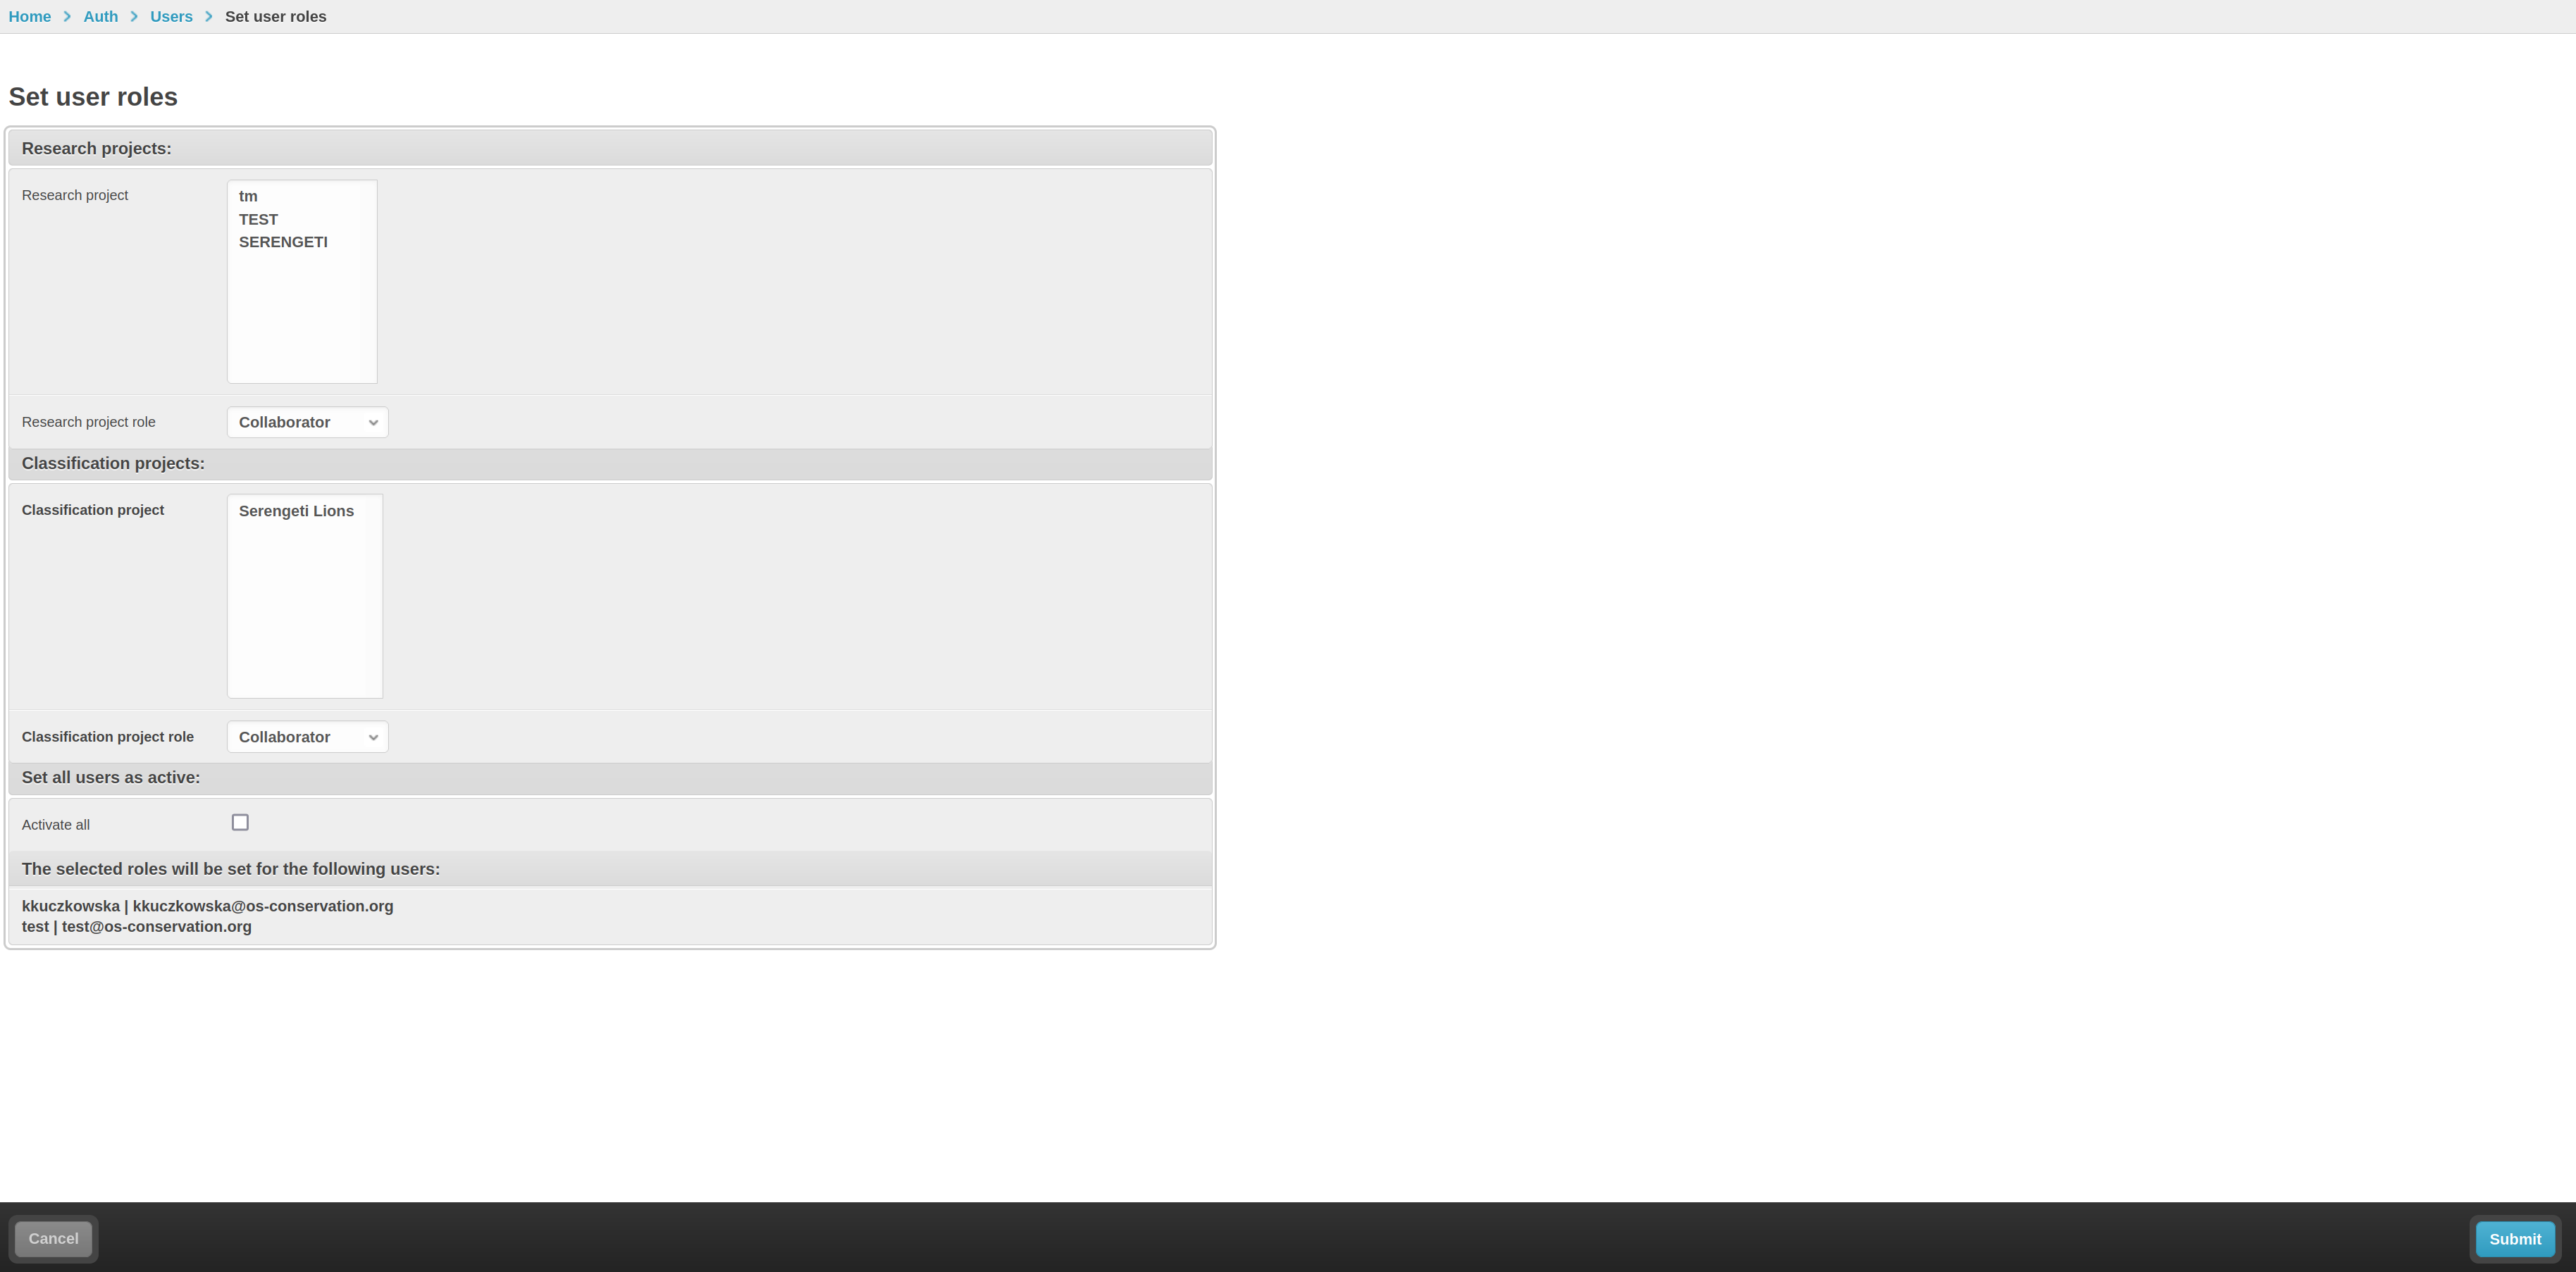
Here you can specify to which Research projects and Classification projects to add Users, and as which roles. By marking the checkmark, you can also activate all selected users.
After filling the form, hit the Submit button in the bottom right corner.
Create/delete FTP accounts
Users will need FTP accounts in order to upload data to the Trapper server. FTP accounts for Users can be created using admin actions.
After selecting Users and running the action, you will see a short form.
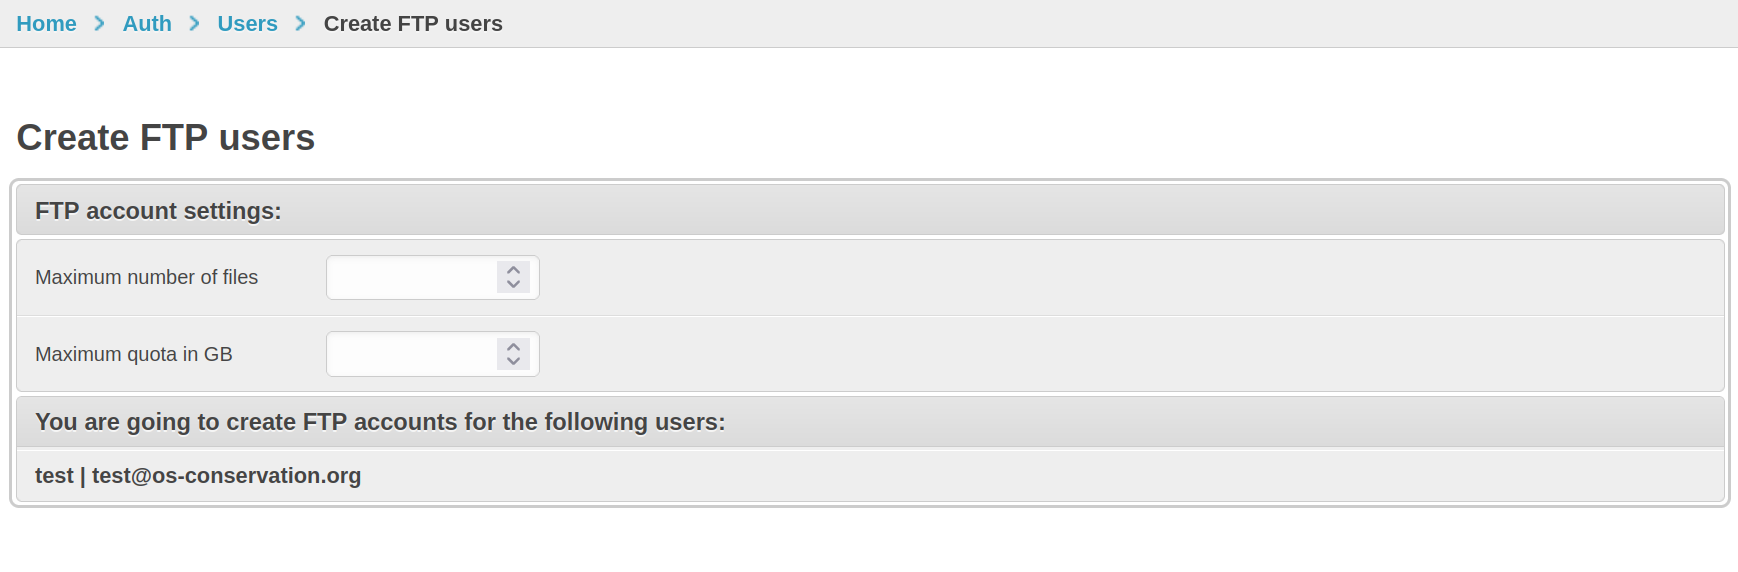
Fill the form and submit.
Creating FTP accounts both allows Users to log in to FTP server using Trapper account credentials, and creates the necessary directory structure in your external media directory.
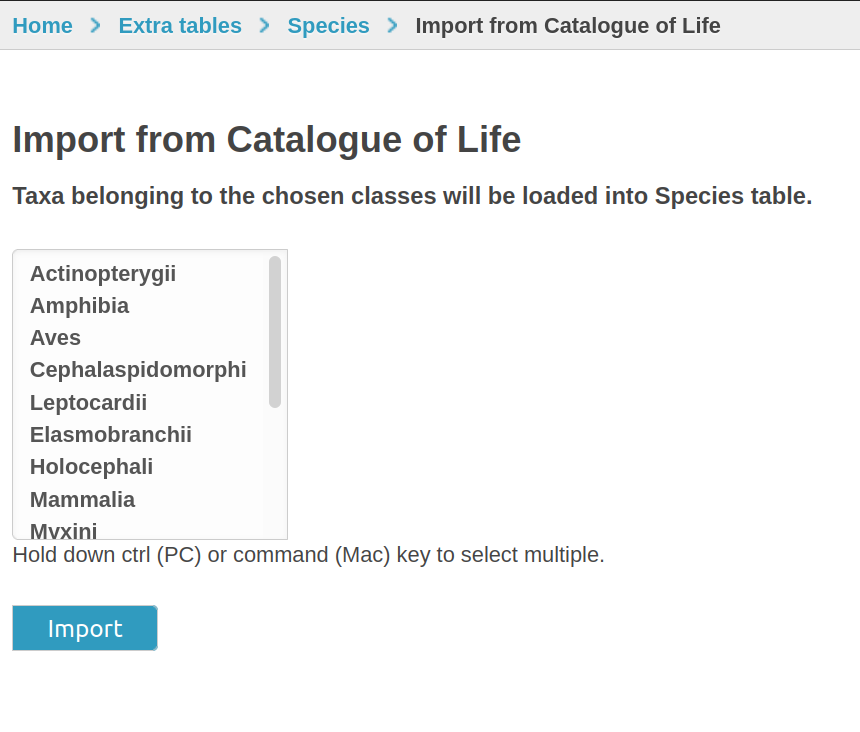
Download Species from Catalogue of Life
Species table needs to be filled by the admin, so that selected Species can be added to Classificators.
You can add them manually one species at a time, use a csv file to import them, or you can run an admin action to download taxa for chosen classes of animals from Catalogue of Life. The action is available in the Species changelist admin view (Import from COL button in top right corner).

In the form, choose classes to import taxa from and submit.
Note
Species import is run asynchronously, so the imported species may not be visible right away after running the action.
Quick TrapperAI Provider Setup
To be able to use AI methods for classification, you need to add a TrapperAI Provider to your Research project.
TrapperAI Provider needs to be manually added and configured via admin panel first.
Go to admin panel → Media Classification → AI Provider → + Add ai provider.

In the first part of the form, choose TrapperAI Provider type. Several fields are required to configure:
Name: Descriptive name for your TrapperAI Provider instance
API URL: URL of TrapperAI API endpoint
API Auth Login/Password: Authentication credentials
Minimum Confidence: Default value is 0.9, meaning predictions below this confidence will not be saved
The most important part of TrapperAI Provider configuration is adding mappings.
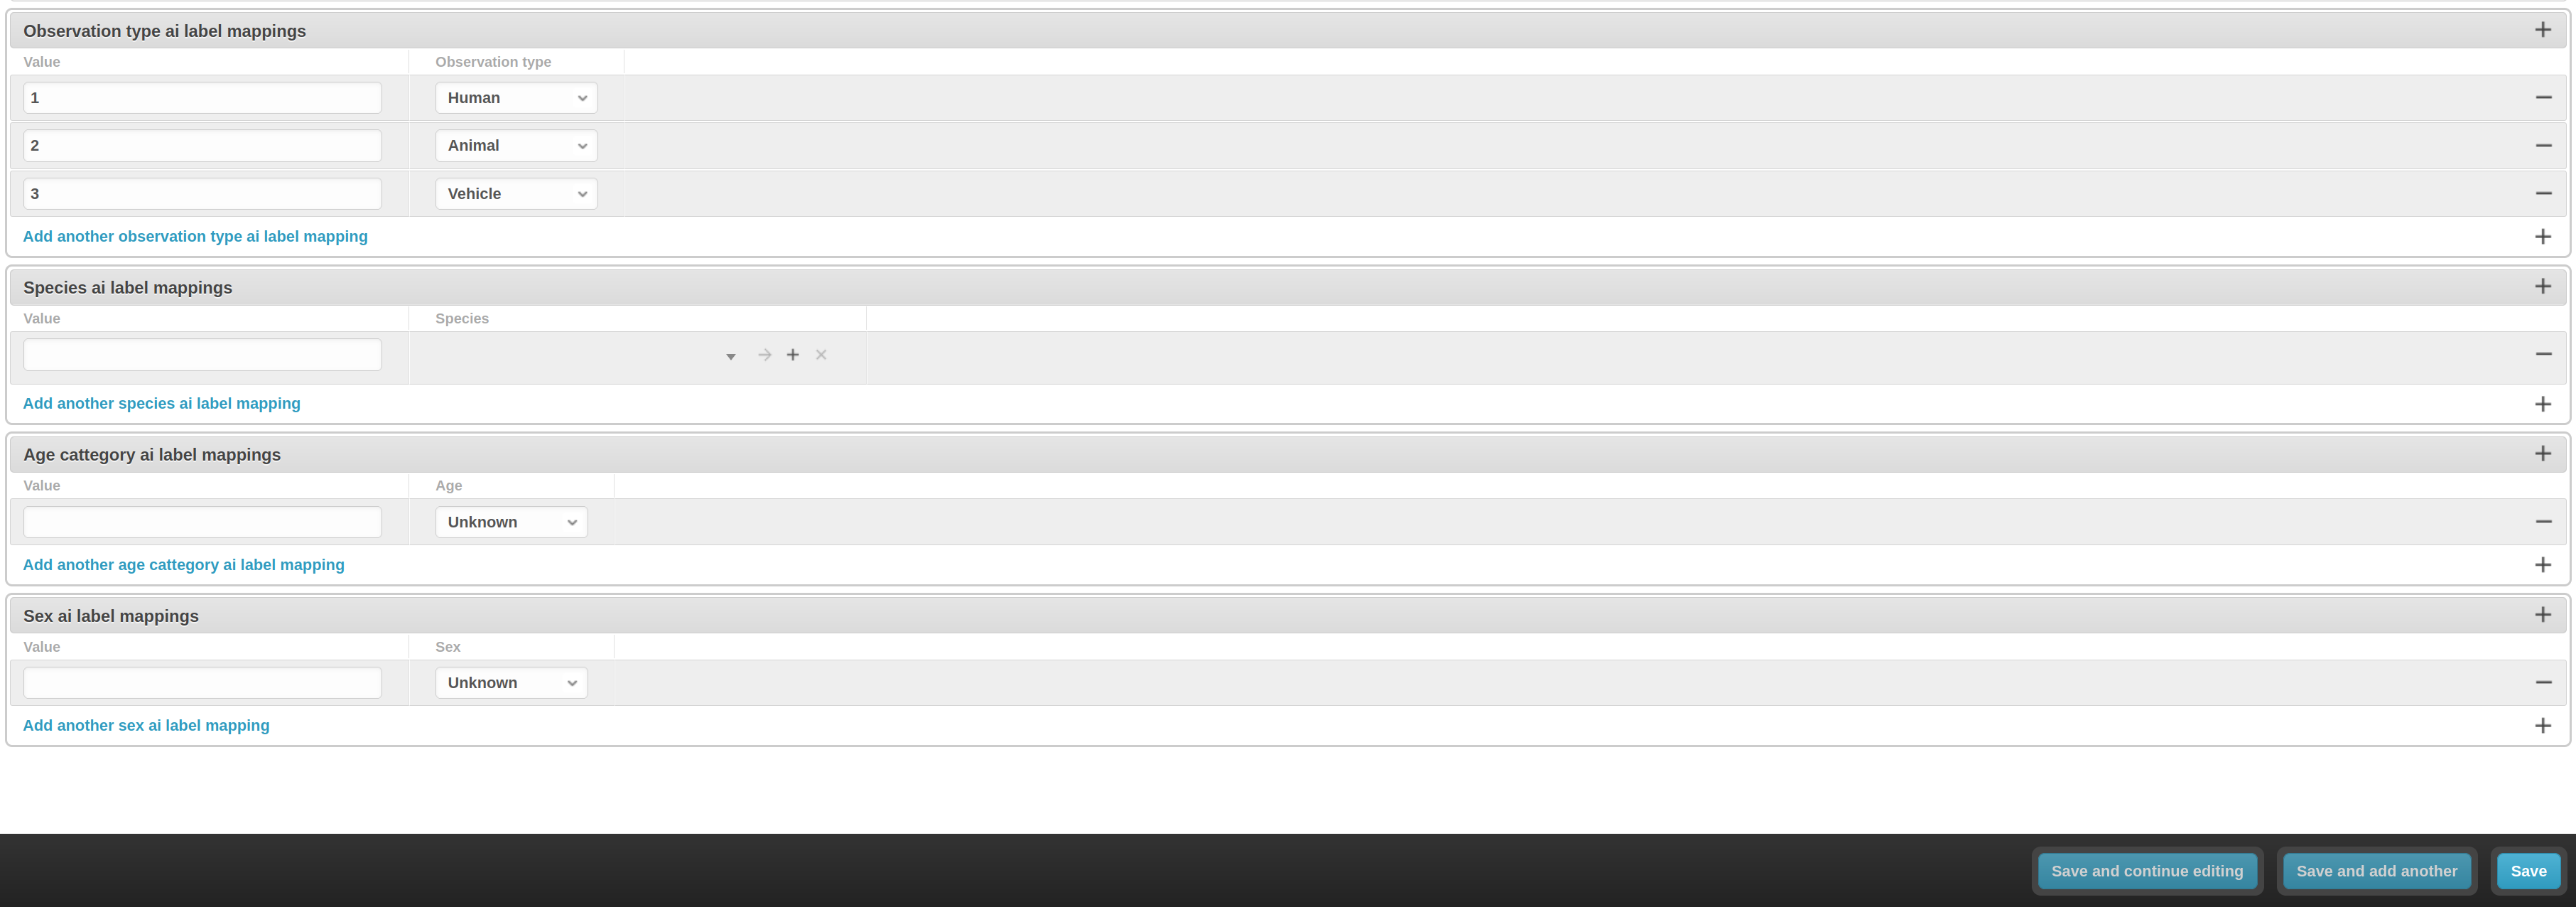
The mappings translate AI classification results to TRAPPER classification attributes - add the values returned by your TrapperAI API and map them to appropriate attribute values.
See also
For comprehensive TrapperAI Provider configuration with detailed examples, see the following section.
TrapperAI Provider Configuration
TRAPPER provides sophisticated artificial intelligence integration through TrapperAI Providers that leverage machine learning models for automated camera trap image analysis. This section covers the complete configuration and administration of AI providers and their integration with Classification Projects.
What is TrapperAI Provider?
TrapperAI Provider is the primary AI service integration in TRAPPER that provides automated image analysis capabilities through local or remote AI models. It supports:
Object Detection: Identifying and locating animals, humans, and vehicles in images using MegaDetector models
Species Classification: Classifying detected animals to species level using specialized classifiers like DeepFaune
Confidence-based Processing: Filtering results based on configurable confidence thresholds
Flexible Mapping: Translating AI model outputs to TRAPPER classification attributes
Creating TrapperAI Provider in Admin Interface
Basic Configuration
Navigate to admin interface (Admin > Media Classification > AI Providers)
Click Add AI Provider and select TrapperAI Provider
Configure basic settings:
Name: Descriptive name (e.g., “MegaDetector v5 Object Detection”, “DeepFaune v1.3 Species Classifier”)
Version: Model version identifier (e.g., “5a”, “1.3”)
Description: Detailed description of the model capabilities
API URL: Endpoint URL for the TrapperAI service
API Auth Login/Password: Authentication credentials for the AI service
AI Model ID: Unique identifier of the model in TrapperAI system
Advanced Settings
Configure specialized options:
Video Support: Enable for models that can process video files
Object Based: Enable for object detection models (usually true)
Crop Image: Enable for species classifiers that require cropped images
Minimum Confidence: Global threshold for discarding low-confidence predictions (0.0-1.0)
Skip Empty: Discard resources without detected observations
Trapper Instance URL: Base URL of your TRAPPER server for callbacks
AI Model Mappings
Configure how AI model outputs map to TRAPPER attributes:
Object Detection Mapping Example (MegaDetector v5)
// Observation Type Labels Mapping
[
  {
    "value": 1,
    "observation_type": "animal"
  },
  {
    "value": 2,
    "observation_type": "human"
  },
  {
    "value": 3,
    "observation_type": "vehicle"
  }
]
Species Classification Mapping Example (DeepFaune v1.3)
// Species Labels Mapping (excerpt)
[
  {
    "value": 0,
    "species": "Meles meles"          // European badger
  },
  {
    "value": 3,
    "species": "Cervus elaphus"       // Red deer
  },
  {
    "value": 7,
    "species": "Capreolus capreolus"  // Roe deer
  },
  {
    "value": 15,
    "species": "Lynx lynx"            // Eurasian lynx
  },
  {
    "value": 18,
    "species": "Lepus europaeus"      // European hare
  },
  {
    "value": 21,
    "species": "Mustela erminea"      // Stoat
  },
  {
    "value": 24,
    "species": "Sus scrofa"           // Wild boar
  },
  {
    "value": 29,
    "species": "Vulpes vulpes"        // Red fox
  }
]
Classification Project AI Configuration
AI Model Assignment
Configure AI models for automatic processing in Classification Projects:
Navigate to Classification Projects in admin interface
Edit your target classification project
In the AI Configuration section, configure:
Object Detection AI Model: Select TrapperAI Provider configured for object detection (e.g., MegaDetector)
Species AI Model: Select TrapperAI Provider configured for species classification (e.g., DeepFaune)
AI Processing Settings
Configure how AI results are processed and integrated:
Required AI: Require AI classification before human annotation can begin
Copy AI Classifications: Automatically copy AI results as initial user classifications
Species Matching IOU Threshold: Intersection over Union threshold for matching species predictions to detections (default: 0.5)
Confidence Thresholds and Quality Control
Set up warning thresholds for quality control:
Observation Type Confidence Warning Threshold: Show warnings when object detection confidence is below this value
Species Confidence Warning Threshold: Show warnings when species classification confidence is below this value
Privacy Protection Settings
Configure automatic blurring for privacy protection:
Blur Humans: Automatically blur detected human faces and figures
Blur Vehicles: Automatically blur detected vehicles and license plates
Blur Backup: Keep backup copies of original images before applying blur
Blur Humans and Vehicles Immediately: Apply blurring immediately after classification (irreversible)
Video Processing Configuration
For projects supporting video analysis:
Video Support Enabled: Enable video file processing
Target FPS: Set target frame rate for video analysis (optional, uses source FPS if not set)
Additional Project Settings
Control annotation behavior and data visibility:
Exclude Humans: Hide human observations from citizen science interface
Exclude Blank: Hide blank/empty observations from citizen science interface
Hide Classification Attributes for Non-Animals: Simplify interface by hiding species attributes for non-animal observations
Complete Configuration Example
Example 1: Object Detection Setup (MegaDetector v5)
TrapperAI Provider Configuration:
├── Name: "MegaDetector v5 Object Detection"
├── Version: "5a"
├── Description: "YOLOv5-based model for detecting animals, people, and vehicles"
├── API URL: "https://your-trapper-ai.org/api/v1/detect"
├── Minimum Confidence: 0.7
├── Object Based: ✓ True
├── Crop Image: ✗ False
└── Mappings:
    ├── Value 1 → "animal"
    ├── Value 2 → "human"
    └── Value 3 → "vehicle"

Classification Project Settings:
├── Object Detection AI Model: "MegaDetector v5 Object Detection"
├── Required AI: ✓ True
├── Copy AI Classifications: ✓ True
├── Observation Type Confidence Warning: 0.6
├── Blur Humans: ✓ True
└── Blur Vehicles: ✓ True
Example 2: Species Classification Setup (DeepFaune v1.3)
TrapperAI Provider Configuration:
├── Name: "DeepFaune v1.3 European Mammals"
├── Version: "1.3"
├── Description: "Classifier for 34 European mammal species"
├── API URL: "https://your-trapper-ai.org/api/v1/classify"
├── Minimum Confidence: 0.8
├── Object Based: ✓ True
├── Crop Image: ✓ True
└── Mappings:
    ├── Value 0 → "Meles meles"
    ├── Value 3 → "Cervus elaphus"
    ├── Value 7 → "Capreolus capreolus"
    ├── Value 15 → "Lynx lynx"
    └── [... 30 more species mappings]

Classification Project Settings:
├── Species AI Model: "DeepFaune v1.3 European Mammals"
├── Species Matching IOU Threshold: 0.5
├── Species Confidence Warning: 0.7
└── Hide Classification Attributes for Non-Animals: ✓ True
Monitoring AI Provider Performance
Performance Metrics
Track AI provider performance through admin interface:
Processing Statistics: Number of images processed, success rates, processing times
Accuracy Metrics: Comparison of AI predictions with human review results
Confidence Analysis: Distribution of confidence scores across classifications
Error Reports: Detailed logs of processing failures and issues
Quality Assurance
Implement quality control measures:
Regular Model Updates: Keep AI models current with latest training data
Accuracy Monitoring: Track how often AI classifications are accepted by reviewers
Bias Detection: Monitor for systematic biases in AI classifications
Performance Alerts: Receive notifications when performance metrics drop
Usage Analytics
Monitor AI usage and resource consumption:
API Call Tracking: Monitor API usage and costs
Processing Queue: Track processing backlogs and queue times
Resource Utilization: Monitor computational resource usage
User Feedback: Collect feedback from users on AI classification quality
Troubleshooting AI Integration
Common Configuration Issues
API Connection Errors: Verify API URLs and authentication credentials
Mapping Problems: Ensure AI output values are properly mapped to TRAPPER attributes
Performance Issues: Check confidence thresholds and processing queue status
Authentication Failures: Verify API keys and access permissions
Error Resolution
Steps for resolving AI processing errors:
Check AI Provider configuration in admin interface
Verify API service availability and authentication
Review processing logs for specific error messages
Test with individual images to isolate issues
Contact AI service provider for service-specific problems
Performance Optimization
Optimize AI processing performance:
Batch Processing: Process multiple images together when possible
Confidence Tuning: Adjust thresholds based on accuracy analysis
Queue Management: Monitor and manage processing queues
Resource Scaling: Scale AI services based on processing demand
Best Practices for AI Configuration
Initial Setup
Start Simple: Begin with object detection before adding species classification
Test Thoroughly: Validate AI performance on representative sample data
Set Conservative Thresholds: Start with higher confidence thresholds and adjust based on results
Monitor Continuously: Regularly review AI accuracy and adjust settings as needed
Production Deployment
Gradual Rollout: Deploy AI processing gradually across projects
Human Oversight: Maintain human review processes for critical classifications
Regular Updates: Keep AI models and configurations current
Documentation: Document all AI provider configurations and changes
Quality Management
Validation Protocols: Establish clear protocols for validating AI classifications
Training Integration: Use AI results to train new annotators
Consistency Checks: Ensure AI classifications align with project standards
Continuous Improvement: Use feedback to improve AI model performance