Tutorial
Warning
🚧 Work in progress
This section is partly outdated and currently under active development and may change without notice. Content, examples, and screenshots may be incomplete or updated soon.
Contributors:
Tim R. Hofmeester (Swedish University of Agricultural Sciences, Department of Wildlife, Fish and Environmental Studies)
Karolina Kuczkowska and Jakub W. Bubnicki (Open Science Conservation Fund)
Claude Sonnet 4 (AI)
The guides below describe how to use TRAPPER core functionalities.
The first manual describes the process of uploading your data to the Trapper server. To start classifying Resources, you need to create a Classification project and a Classificator, as described in the second manual, and a third manual for classifying Resources once you have a running Classification project.
Opening and logging in to TRAPPER
Go to the demo instance and register an account on the TRAPPER server. After your account is activated by an admin, you can log in on the same page using your email address and password.
How to upload data into TRAPPER
1. Create a research project
In the top menu, select Research > Add research project.

You now get a menu with different options to fill in:

Fill in all information for your research project and click Add research project. Make sure you choose an acronym that is more than 3 characters long, which will make it easier to find it with the auto-fill function in Trapper.
Note
Right after adding your research project, you will see a notification that your project has been successfully added but needs to be activated by an admin. In practice, this means that your project request has been placed in the Admin dashboard and must be manually approved by an admin. This is one of the security measures and ways to control the amount and content of projects in your institution/team. If you are an admin yourself, you can go to the Admin dashboard and approve the project.
As soon as an admin approves your new project, it will appear in your Research view in a Research projects table presenting the project Name, Acronym, Keywords, and Actions. In Research projects, all the projects you have access to are listed. You can filter your projects according to their content and/or the role you play in them.
2. Add locations to TRAPPER
Once you have created a Research project, you can add Locations to your project. There are two ways to do this in TRAPPER: You can add locations manually, or you can upload a file with location data.
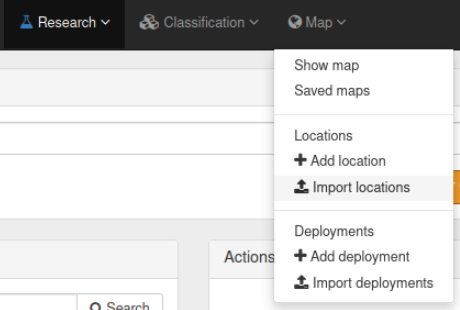
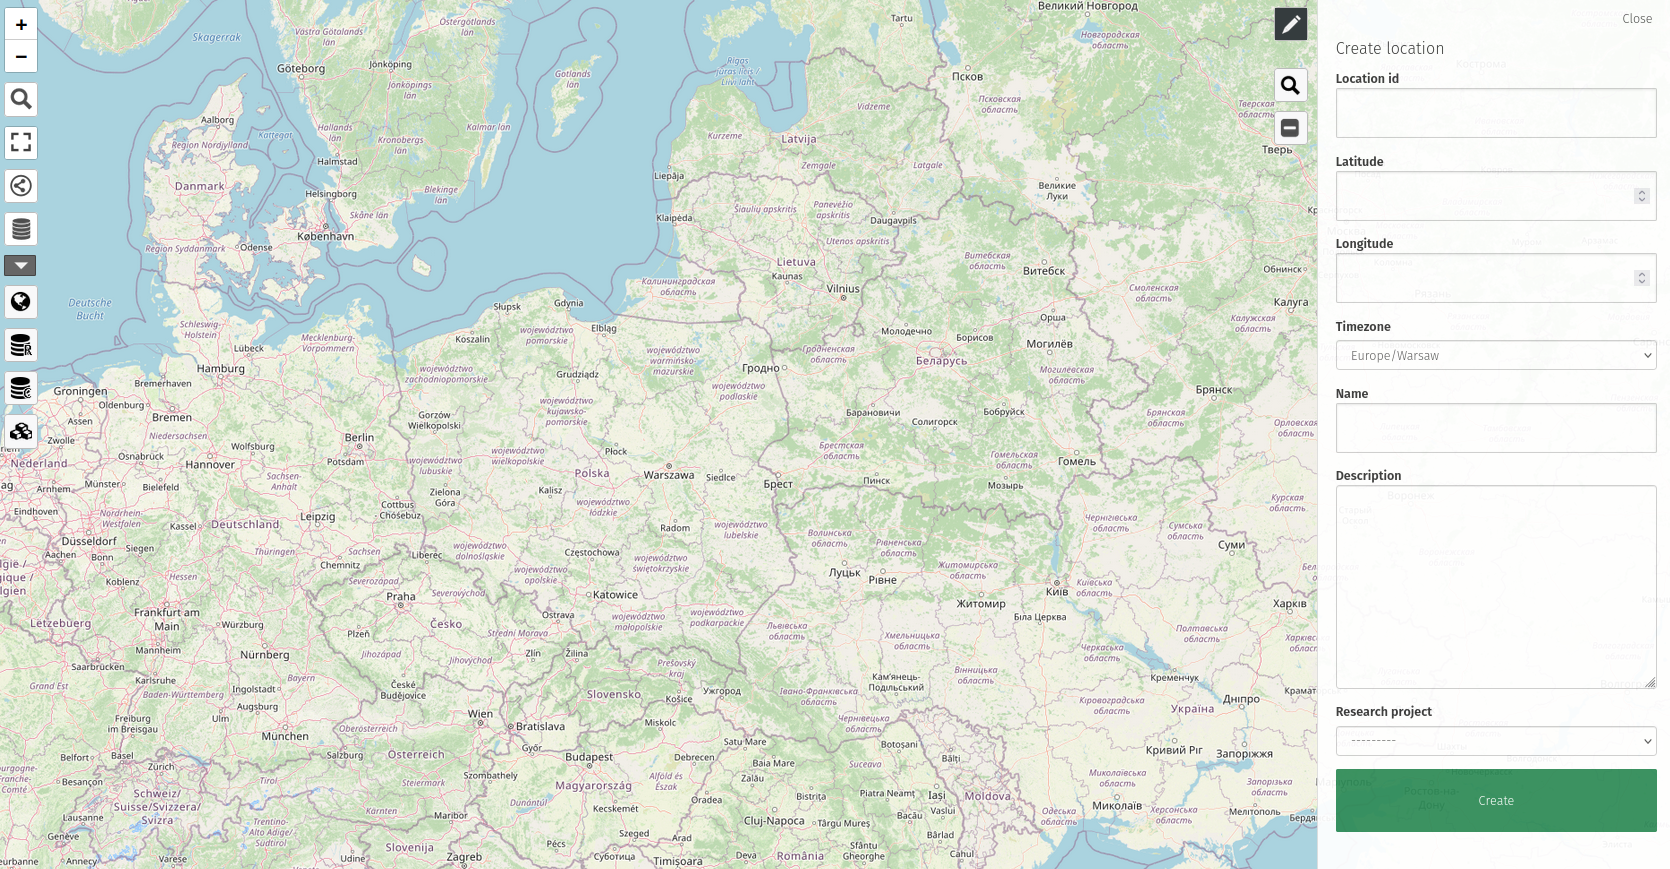
To manually add locations, select Map > Locations > Add location.
You now go to the map view where you can manually add information for a camera trap location.
Most of the time, you want to add multiple locations at once, which can be done using a .csv or .gpx file with location information. It is easiest to use a .csv file, which should be comma- separated and should contain the following columns:
locationID: the ID/name of the locationlongitude: the longitude of the location in WSG84 decimal degrees (e.g., 19.58536776)latitude: the latitude of the location in WSG84 decimal degrees (e.g., 63.55417296)
Once you have created the file, you can add the locations to TRAPPER using Map > Locations > Import locations.
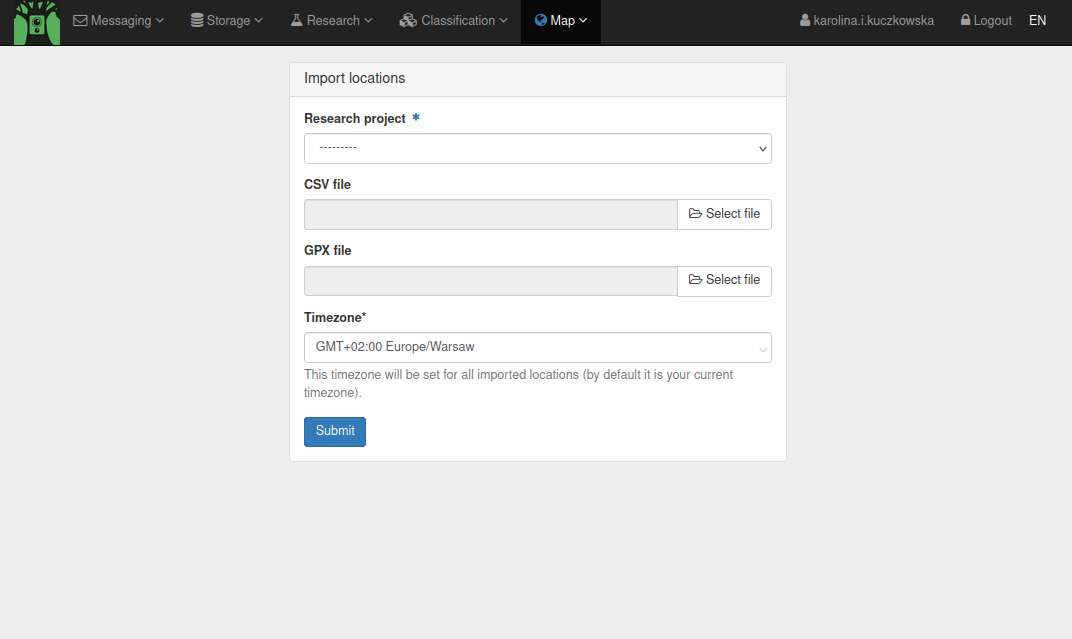
Select the .csv file, make sure you select the right Timezone (e.g., Europe/Stockholm) and select the Research project to which you want to add the locations. Once you have done this, you can select Upload to add the Locations to your Research project.
3. Set up Trapper-Tools
Warning
The legacy Trapper Client is no longer supported for data uploads. Use Trapper Tools instead.
We provide a Python CLI application called Trapper Tools to handle data conversion, packaging, and upload processes. Trapper Tools creates standardized data packages with metadata and uploads them securely to the Trapper server via FTPS.
Trapper Tools is available from the GitLab repository: https://gitlab.com/trapper-project/trapper-tools
Installation Requirements:
Python 3.11 or higher
FFmpeg (for media conversion)
ExifTool (for metadata extraction)
Access to a Trapper server instance
Installation:
You can install Trapper Tools using pip:
pip install "git+https://gitlab.com/trapper-project/trapper-tools.git"
Docker-based Setup:
For a containerized setup, create a docker-compose.yml file:
services:
  trapper-tools:
    image: registry.gitlab.com/trapper-project/trapper-tools:latest
    container_name: trapper-tools
    volumes:
      - trapper_tools_settings:/home/trapper/.trapper-tools
      - ${DATA_PATH:-./data}:/data
    env_file:
      - .env

volumes:
  trapper_tools_settings:
Run commands with:
export DATA_PATH=/path/to/camera_trap_data
docker compose up -d
docker compose exec --user trapper trapper-tools bash
Note
When using Docker, FFmpeg and ExifTool are already included in the container image, so you don’t need to install them separately on your host system.
Configuration:
Create a configuration file to store your Trapper server credentials and project settings:
trapper-tools config --init
This creates a configuration file at ~/.trapper-tools/default.toml. Edit this file to include:
Server URL: The URL of your Trapper server (e.g.,
https://your-trapper-instance.org/)Username: Your Trapper account email
Password: Your Trapper account password
Project ID: The numeric ID of the research project you want to upload data to
FTP settings: Connection details for secure file transfer
Example Configuration:
[GENERAL]
host = "https://your-trapper-instance.org"
login = "your-email@example.com"
password = "your-password"
project_id = 123
verify_ssl = true

[UPLOAD]
ftp_tls = false
trigger = true
Note
Make sure you have an FTP account connected to your Trapper account (ask the admin of your Trapper server for this). Trapper Tools uses FTPS for secure file transfer.
Data Organization:
Organize your camera trap data in the following structure:
project_directory/
├── collection_name_1/
│   ├── deployment_id_1/
│   │   ├── filename_1.jpg
│   │   ├── filename_2.jpg
│   │   └── ...
│   ├── deployment_id_2/
│   │   ├── filename_1.jpg
│   │   └── ...
└── collection_name_2/
    └── ...
Ensure deployment folder names match the deployment codes in your TRAPPER database for validation.
Testing Installation:
Verify your installation and configuration:
# Test external tools
trapper-tools helpers test_external_tools

# Test server connection
trapper-tools helpers test_connection
Complete Automated Workflow:
For the most efficient workflow, use the pipeline command to automate the entire process:
# Complete workflow: convert → package → upload → trigger AI processing
trapper-tools pipeline --data-path /path/to/data --convert --trigger
This single command handles:
Media conversion to web-friendly formats
Data package creation with metadata extraction
Secure FTPS upload to the server
Automatic triggering of AI processing pipeline
For more detailed control, you can run individual steps:
# Convert media files
trapper-tools convert --data-path /path/to/data

# Create data package
trapper-tools package --data-path /path/to/data

# Upload to server
trapper-tools upload --file-yaml package.yaml --file-zip package.zip
Citizen-Science interface - Alternative Upload Method
For smaller deployments or for user-friendly uploads, you can use the trapper-frontend web interface:
Drag-and-drop uploads: Upload individual deployment folders through the web browser easily (up to ~10k files in a single request).
Real-time processing: Get immediate feedback on upload progress and AI processing results.
User-friendly interface: Ideal for interactive exploration of AI-processed data, expert validation, generation of object-based training data for AI models, citizen science projects, distributed network monitoring, and occasional users.
Single-deployment focus: Best suited for uploading one deployment at a time.
Access the upload interface through the trapper-frontend web application at your TRAPPER instance. See Citizen Science Interface for more details.
When to Use Each Method
trapper-tools: Best for large datasets, batch processing, automated workflows, and technical users
trapper-frontend: Best for small deployments, occasional uploads, training users, and citizen science projects
Note
Both methods support the same AI processing pipeline and produce identical results in TRAPPER.
4. Add deployments to TRAPPER
Now that you have added your locations to TRAPPER, you can start adding Deployments. The main differences between Locations and Deployments are that Locations only specify the coordinates where a camera trap was located, while Deployments also specify the start and end date and time of a camera trap in the field. A Location can have several Deployments. Usually, a Deployment is determined as one session of putting out the camera and picking it up, or a session between changing cards and batteries.
Again, it is possible to manually add Deployments, but this is rather error-prone. Therefore, in this manual we will only deal with adding Deployments based on the camera trap data itself. This will ensure that deployment times are correct for all Deployments, even those with cameras that stopped working before they were picked up.
You can create a .csv file with your Deployment information using Trapper Tools. For this to
work, the data must be organized in the correct way: a main directory with sub-directories
for each Collection. A Collection can, for example, be one round of Deployments. Within each
Collection, there are further sub-directories for each Deployment. These sub-directories
should be labeled in congruence with other information provided to TRAPPER. The Deployment
label is a combination of a unique code and the Location label. For example, you can use a
unique code R1 (for round 1) for the first Deployment at a certain Location, e.g., 32_01.
The Deployment label then becomes: R1-32_01.
Use Trapper Tools to generate a deployment template:
trapper-tools helpers template --data-path /path/to/data
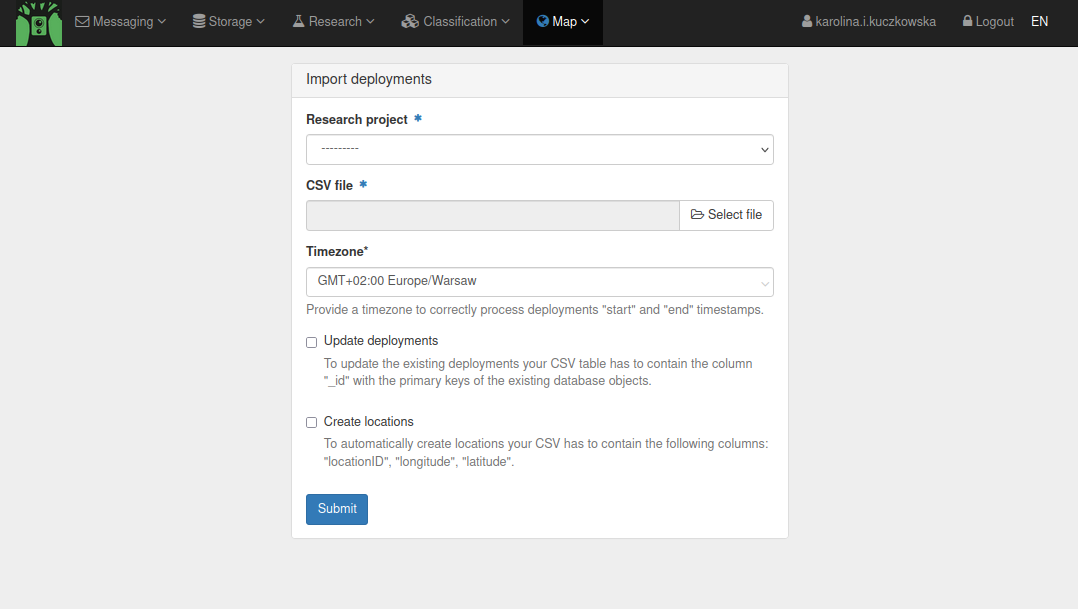
This will analyze your media files and generate a .csv file with the Deployment table containing deployment metadata. You can then upload the .csv to TRAPPER by selecting Map > Deployments > Import deployments.
Note
The automatically generated Deployment table contains only a minimum set of metadata fields needed to import deployments into TRAPPER. See https://camtrap-dp.tdwg.org/data/#deployments for a full list of supported metadata fields that can be imported into TRAPPER.
Note
Please note that if your Deployment table contains longitude and latitude fields,
location objects associated with imported deployments can be created automatically, and you can
skip the previous step of importing the Location table (2. Add locations to TRAPPER).
Select the previously generated .csv file and the Research project to which the round of Deployments belongs, and click Submit.
5. Add resources to TRAPPER
Once the Deployments are added, the Resources (e.g. images) made by the camera traps can be uploaded into TRAPPER. TRAPPER supports multiple upload methods depending on your needs.
Upload Methods
TRAPPER offers two main approaches for uploading data:
trapper-tools (Recommended): Command-line tool for batch uploads with automated processing
trapper-frontend: Web interface for single deployments and smaller datasets. See Citizen Science Interface for more details.
Note
The media files must be organized in the directory structure described earlier: main directory
with sub-directories for each Collection, and within each Collection, sub-directories for
each Deployment labeled as described in the previous section (e.g., R1-32_01).
Recommended: Automated Pipeline with trapper-tools
For the most efficient workflow, use the pipeline command with the --trigger flag to enable
automatic processing:
# Complete automated workflow with AI processing
trapper-tools pipeline --data-path /path/to/data --convert --trigger
The --trigger flag is critical for automatic processing. This single command will:
Convert media files to web-friendly formats (if
--convertis specified)Create a data package with metadata extraction
Upload the package securely via FTPS
Automatically trigger the AI processing pipeline including:
Object detection (animals, humans, vehicles)
Species classification
Sequence building
Privacy blurring
Without the --trigger flag, data will be uploaded but not automatically processed, requiring
manual intervention through the web interface.
Alternative: Step-by-Step Process
If you prefer more control over the upload process, you can run individual steps:
Step 1: Create a data package
trapper-tools package --data-path /path/to/data
This command will:
Analyze your media files and validate that corresponding deployments exist in TRAPPER
Create a .zip file containing all your media data
Generate a .yaml file with the package metadata (package definition file)
Step 2: Upload the data package via FTPS
trapper-tools upload --file-yaml package.yaml --file-zip package.zip --trigger
Important: Always include the --trigger flag to enable automatic processing.
Additional Examples
# Convert media first, then package and upload with automatic processing
trapper-tools convert --data-path /path/to/data
trapper-tools package --data-path /path/to/data
trapper-tools upload --file-yaml package.yaml --file-zip package.zip --trigger

# Process specific collections only with automatic processing
trapper-tools pipeline --data-path /path/to/data --collection summer_2024 --convert --trigger

# Upload with custom package name and trigger processing
trapper-tools package --data-path /path/to/data --package-name "winter_survey_2024"
trapper-tools upload --file-yaml winter_survey_2024.yaml --file-zip winter_survey_2024.zip --trigger
Manual Loading via Web Interface (Alternative)
If you need to manually load data that was uploaded without the --trigger flag:
Go to Storage > Upload collection on your TRAPPER server
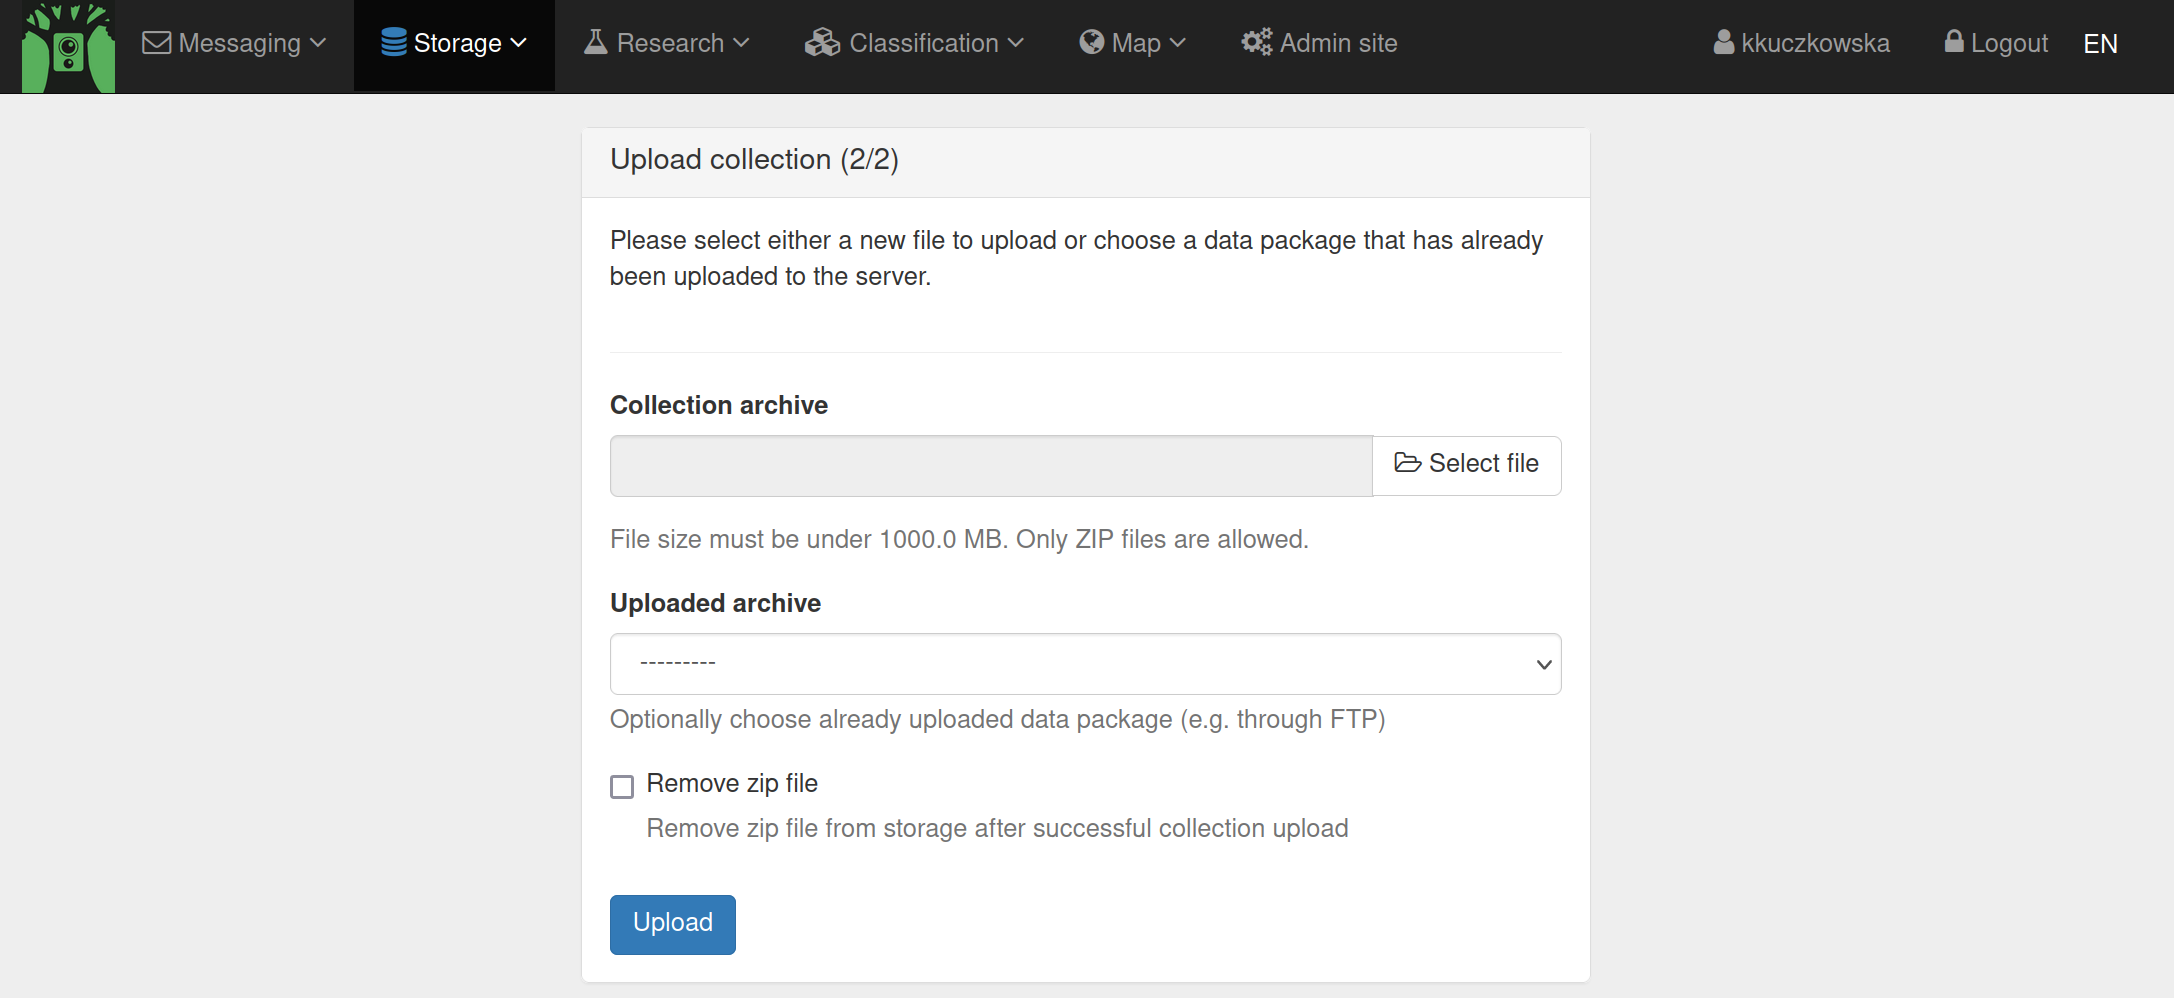
Select the .yaml file that you uploaded and click ‘Upload’
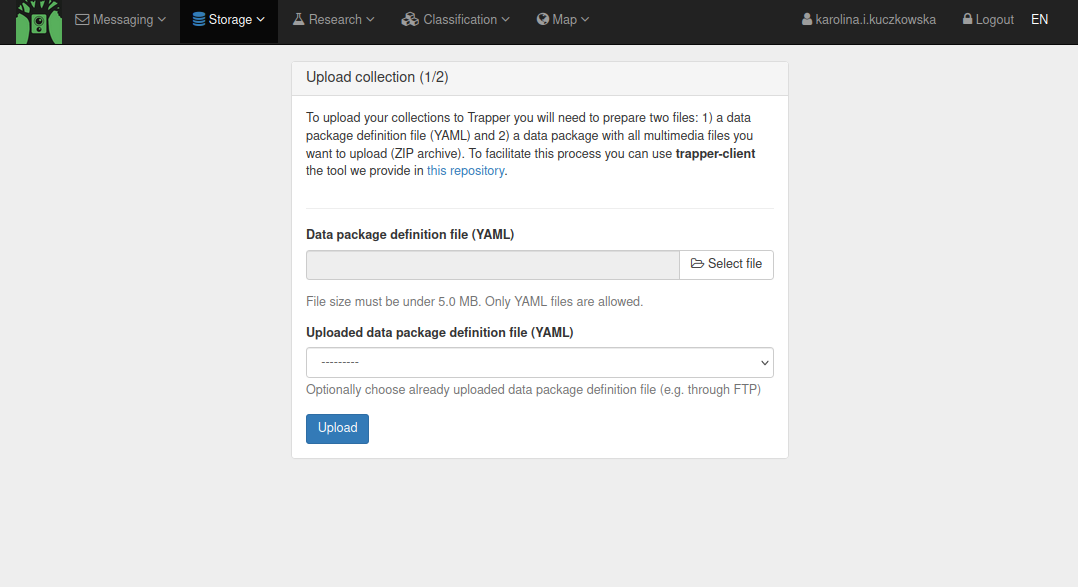
Select the .zip file you uploaded in the second window and click ‘Upload’ to load your data package into TRAPPER
You have now created a Collection containing the Resources of all the Deployments that you used while creating the Collection. This Collection is added to the correct Research project automatically. You can browse the Resources in the Collection by going to Storage > Resources (available).
See also
administration-ai-providers for AI Provider configuration and configuration-ai-pipeline for AI Pipeline setup required for automatic processing.
How to create a Classificator and Classification project in TRAPPER
1. Create a Classificator
In TRAPPER, images are classified in Classification projects using a Classificator. One of the great advantages of TRAPPER is that researchers or students can build their own Classificator and Classification project depending on the research question. A Classificator basically describes a set of attributes that are used while annotating an image or sequence of images.
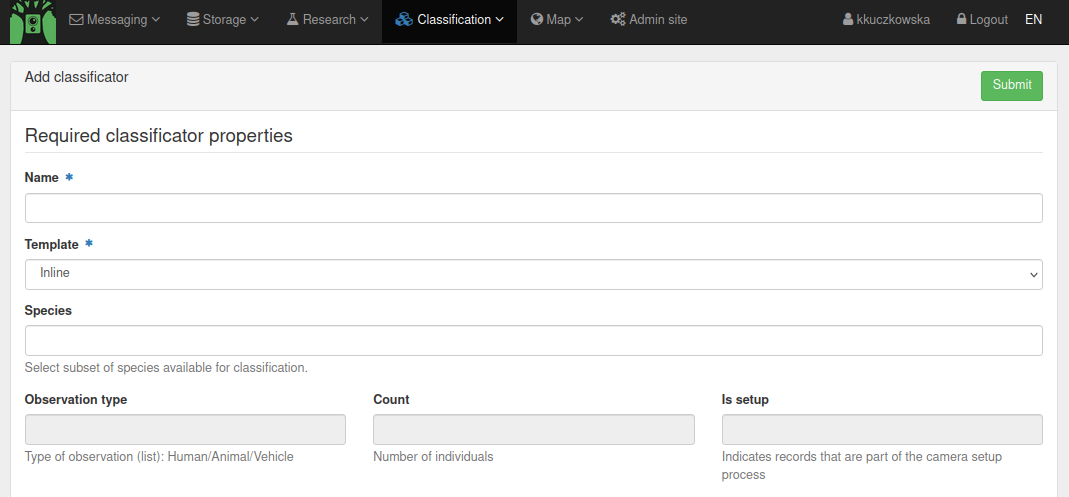
In the top menu, select Classification > Add classificator. First there are some required classificator properties that you have to fill in, such as name and template. Furthermore there are several attributes that have become mandatory in the latest version of Trapper, which are species, observation type, count and ‘is_setup’. The ‘is_setup’ and observation type were added to make it easier to include a first screening of images by Microsoft’s MegaDetector, a machine learning algorithm that automatically identifies empty images from images containing a human, an animal, or a vehicle. Also, you can add species you want to classify based on entries in the species list.
Note
Admins can add species to the overall species list in the Admin panel under Species either a single species at a time or using a .csv file, or download taxa for entire classes from Catalogue of Life.
Further down on the page, you see a lot of different options, which I will explain step by step.
There are two types of attributes: static and dynamic attributes. Static attributes are attributes that are only given once for each resource, e.g., ‘is setup’. Dynamic attributes are attributes that can be given multiple times for one resource, e.g., the species or sex of an animal recorded by the camera trap.
There are several pre-defined attributes available to quickly add to your Classificator by checking the boxes.
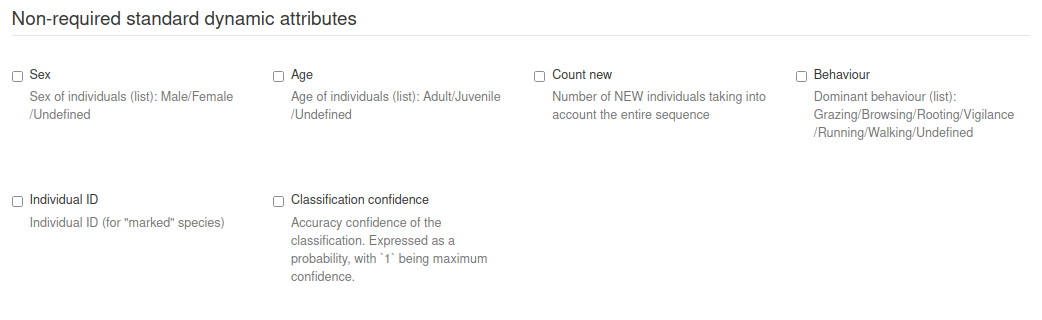
Then you can also add custom attributes in the custom attribute form. This form gives a lot of freedom to determine your own attributes. Below, you find the attributes of an example Classificator.
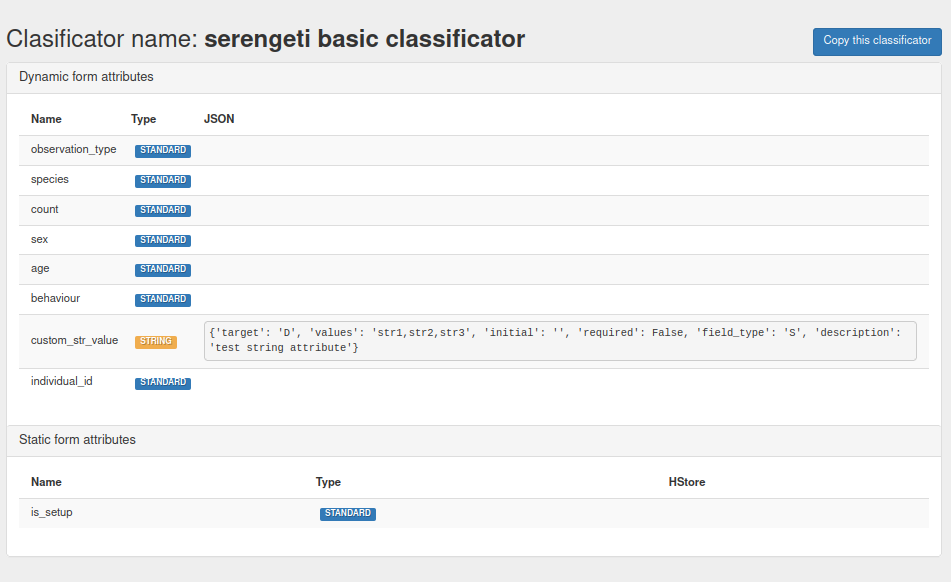
You can check all the Classificators on your TRAPPER server by going to Classification > Classificators.
2. Create a Classification project
Once you have created your Classificator, you can create a Classification project to start classifying your resources. You can create a new Classification project by going to Classification > Add classification project.
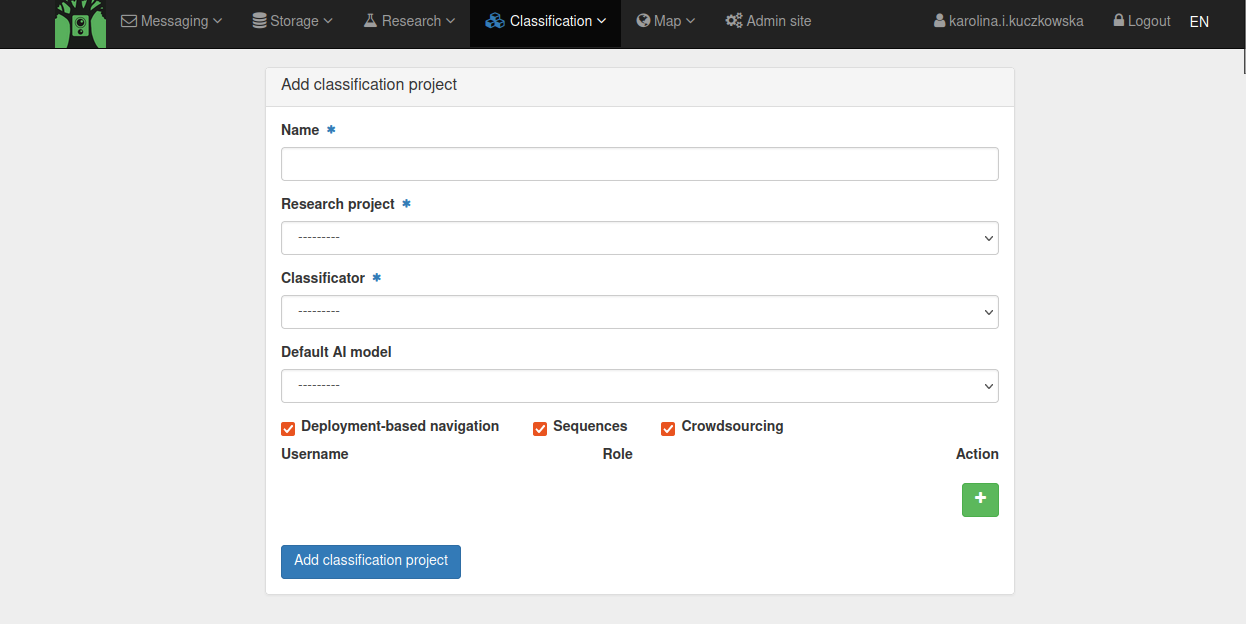
Here you can specify the name of the Classification project, the Research project to which the Classification project belongs, which Classificator and default AIProvider to use, and which users are involved in the Classification project. When you have finished filling in all details, click Add classification project. You have now created a Classification project.
You can check all the Classification projects to which you have access by going to Classification > Classification projects.
3. Add Resources to a Classification project
In order to be able to classify Resources, you need to add them to your Classification project. To do this, first go to your Research project by going to Research > Research project and clicking on the magnifying glass next to your research project.
Now you will see a selection of all Collections that are linked to the Research project.
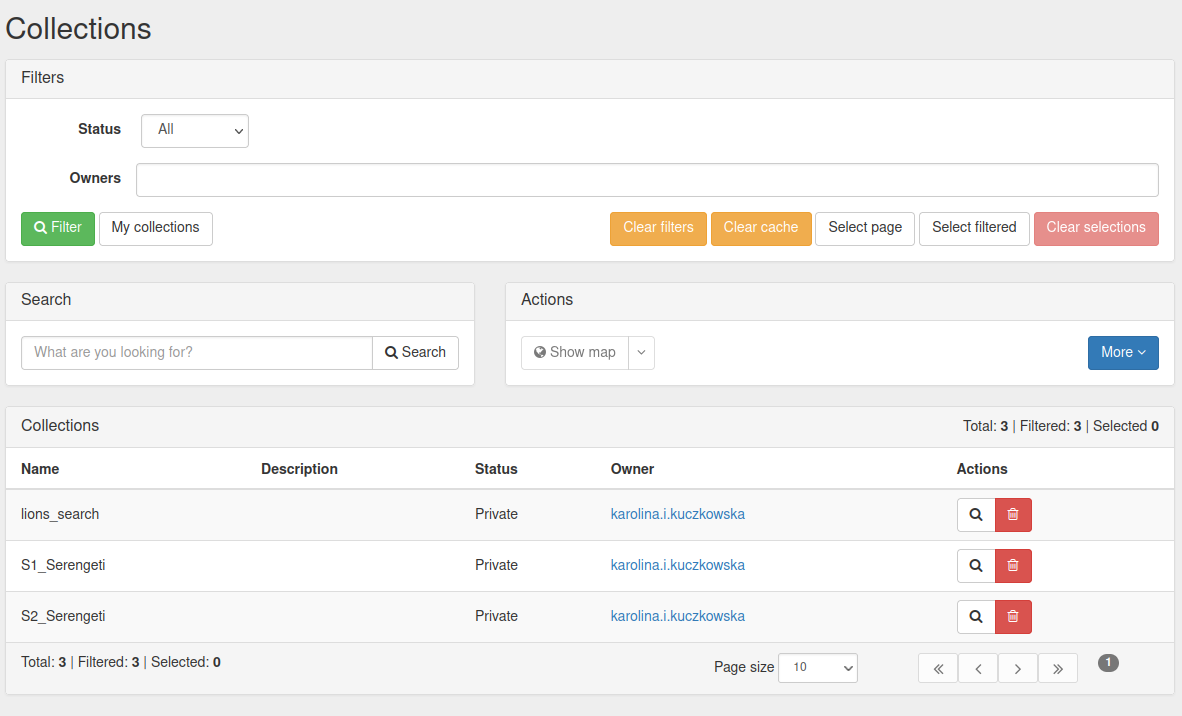
Select a Collection by clicking on it and under Actions > More select ‘Add to Classification project’.
You now have Resources in your Classification project that can be classified.
How to classify images in TRAPPER
1. Go to the classification page
In the top menu, select Classification > Classification projects. You are now at the starting screen of all classification projects that you have access to. You will see information on each Classification project, including its name, the Research project it belongs to, its status and Actions.

To select the Classification project you want to work in, select the magnifying glass underneath Actions.
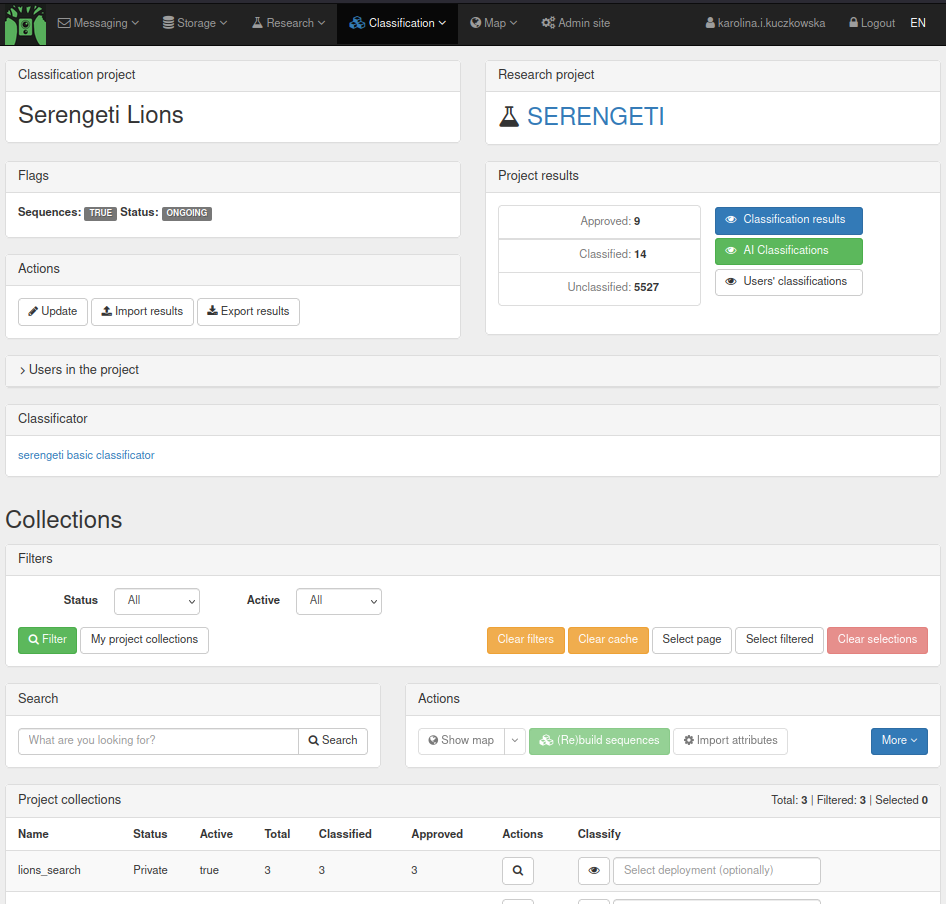
You are now on the starting screen of the selected Classification project. Here you see more information on the Classification project, including which Classificator is used, which Collections are in the project, and to which Research project the Classification project belongs. Furthermore, you can see how many of the Resources have been Classified and Approved.
Go to the bottom of the page, where you can find the different Collections in the Classification project (for example, the different rounds during which cameras were placed out in the field). Type the name of the Deployment within a Collection that you would like to classify and select it. This ensures that you are classifying a specific Deployment, which makes it easier to keep an overview during the classification. Once you have selected the Deployment, select the eye symbol to start the classification.
Note
Make sure you generate sequences for your collection by selecting the collection and clicking ‘(Re)build sequences’. You can specify a time interval between sequences. The default is 5, regular use is 15 minutes.
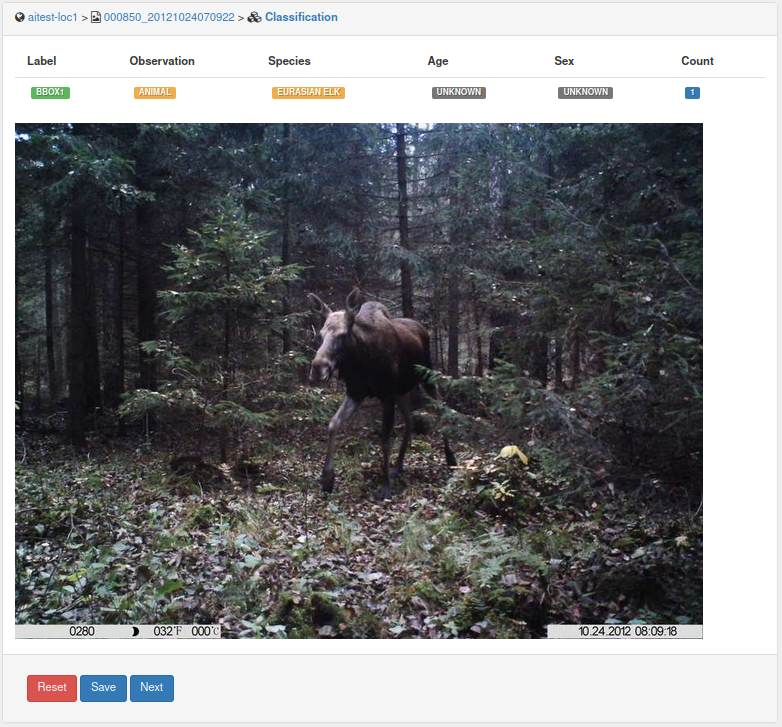
2. Classify a sequence using the initial classification forms
You will now see a screen such as the one below. You can see the different Resources (images) with an orange number. This is the Sequence number.
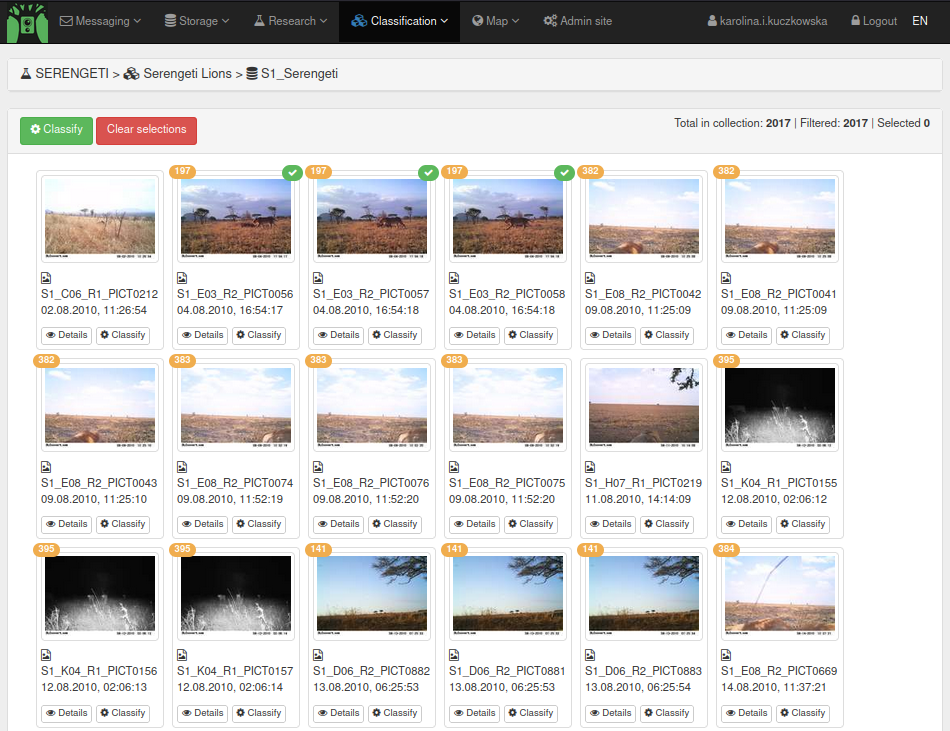
Note
To circumvent problems of two people classifying the same Deployment, only start classifying a Deployment if none of the Sequences have been classified yet. You can see if a Resource has been classified by a green mark (note 3 Resources - one Sequence - classified and others not classified in the screen cap above). At the same time, make sure that you classify all Sequences in a Deployment (keep track of which Deployment you are classifying). If you cannot finish a deployment, contact your admin.
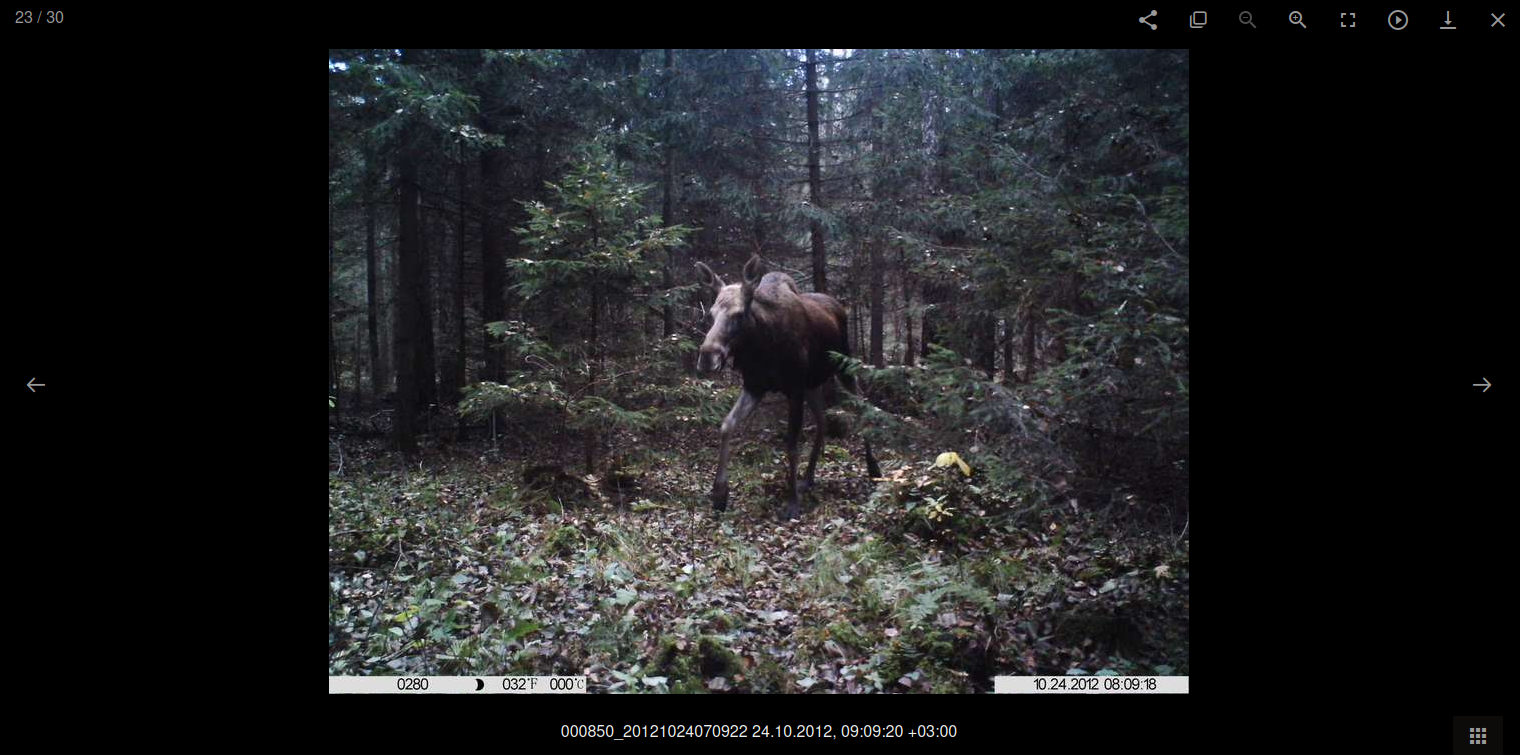
You can now enlarge pictures by clicking on the thumbnail. You can scroll through the enlarged pictures with your arrow keys. It’s always good to check the whole sequence before classifying it to check you didn’t miss any individuals in the thumbnails.
When you have decided how many individuals and which species is visible in the Sequence, it is time to classify the Sequence. To do this, click on the sequence number. This will select all images in the sequence. You can now click ‘Classify’ in the top of the screen to classify the whole sequence. Make sure to check for empty images at the end of the sequence as it is good to classify those separately as ‘observation_type = blank’.
In the classification view, fill in the right information for the sequence. You classify ‘is_setup’ as True for setup and test images, you can then delete all dynamic attributes by clicking on the red cross.
Note
Classify empty resources as Observation type = Blank.
Otherwise, keep the default False and add the dynamic attribute information.
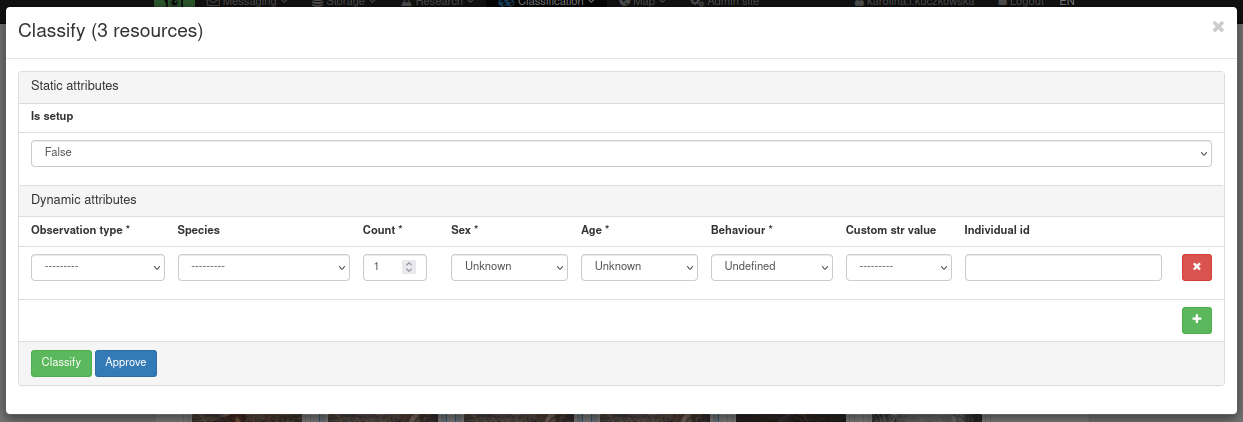
Dynamic attributes are attributes that can be given multiple times for one sequence. In this case, it gives information about the type of observation, the species of animal, if the observation contains one or more animals, sex, age and behaviour of the animals, and optional custom str value (as specified in the Classifier) and individual id.
In the standard classification form there are three required attributes:
Observation type: the type of observation (Human/Vehicle/Animal/Blank/Unknown/Unclassified)
Species: The animal species shown in the image (to be selected from Species from Classificator)
Count: The number of animals/humans/vehicles, default is 1
There are also several attributes that can be assigned, as described in the Classificator adding manual.
If there are multiple animals in the field with different attributes, you can add a row by clicking the green button with a plus sign to specify the attributes of all animals in the sequence.
Click ‘Classify’ to finish the classification.
The Sequence is now classified and you can go to the next Sequence by clicking on the orange sequence number. Follow the steps above until you have classified all resources in a Deployment.
Note
FOR GROUPS OF ANIMALS: If there is one image in which all animals in the group are present, please classify the sequence per picture. In this way we can estimate retention time of individuals (especially with groups <5). With big groups, or groups where animals are never all in the picture, classify the whole group in one sequence. This ensures that we have the right number of animals passing in the analysis by just selecting the maximum per sequence. Again, make sure that empty pictures that are part of the sequence are classified as empty.
Note
If a person is in the frame with a dog, add two observations: one with observation_type = human and species Homo sapiens and the other with observation_type = animal and species Canis familiaris.
3. Adding bounding boxes for training dataset for Machine Learning
TRAPPER provides the capability to add bounding boxes to each classification to delimit where objects (animals, humans, or vehicles) are located. These bounding boxes aid in training Machine Learning algorithms for automatic species identification.
Using the Citizen Science Frontend
For most users, the recommended approach is to use the new citizen science frontend which provides an intuitive interface for drawing bounding boxes directly on images during the classification process.
To access the citizen science interface:
Navigate to your classification project
Select the deployment you want to work on
Click on a resource to open it in the citizen science interface
Draw bounding boxes by clicking and dragging on the image
Associate each bounding box with the appropriate classification attributes
The citizen science frontend automatically saves bounding boxes as part of the classification process and provides a streamlined workflow for rapid annotation.
Using the Expert Interface
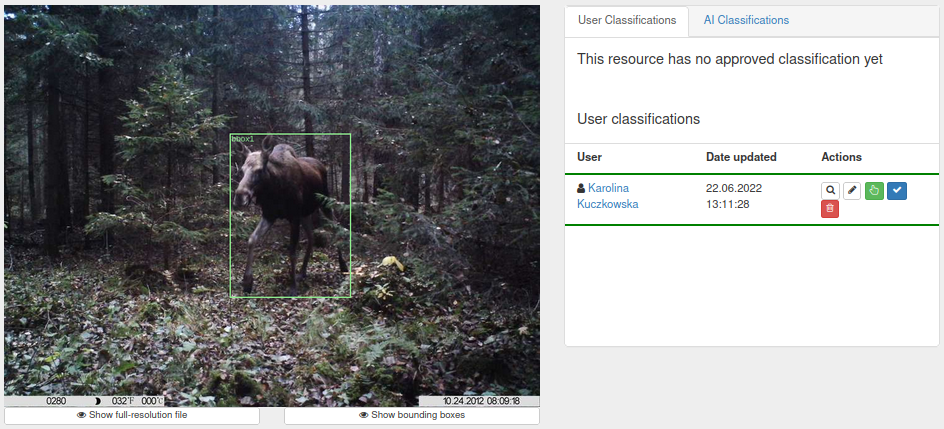
For advanced users who need access to detailed classification features, you can also add bounding boxes through the expert interface. To do this, go to the ‘classic’ classification view by clicking on ‘Details’ underneath a thumbnail.
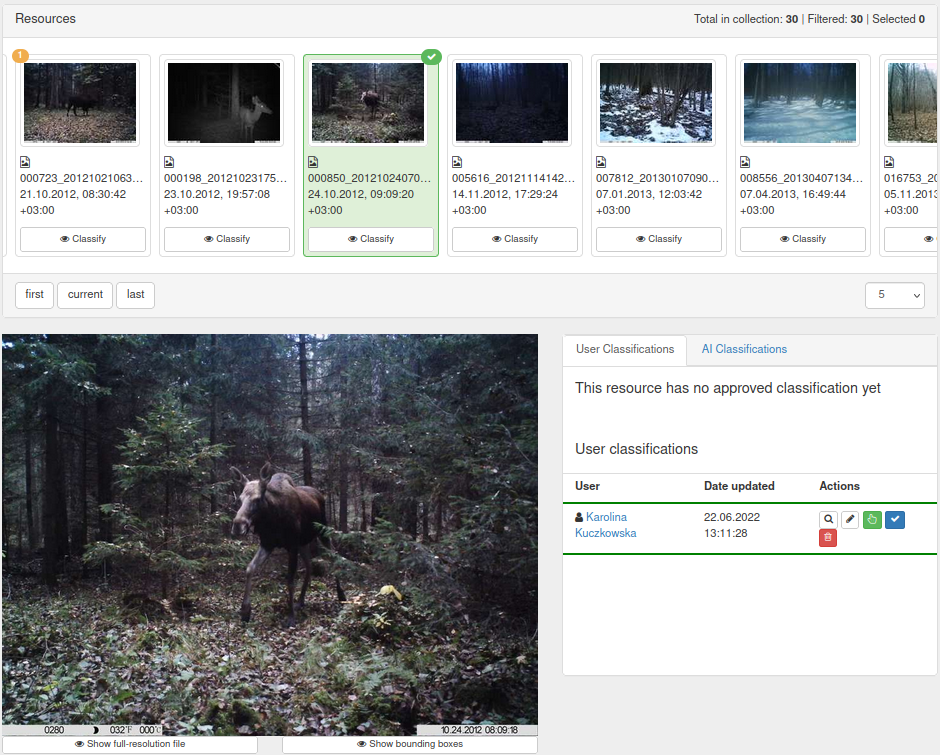
You can add a bounding box by clicking on the green hand symbol on the user classification. This will lead you to the bounding box drawing interface.
Draw a box around the object as tightly as possible. You can then specify which dynamic attribute field should be linked to this bounding box.
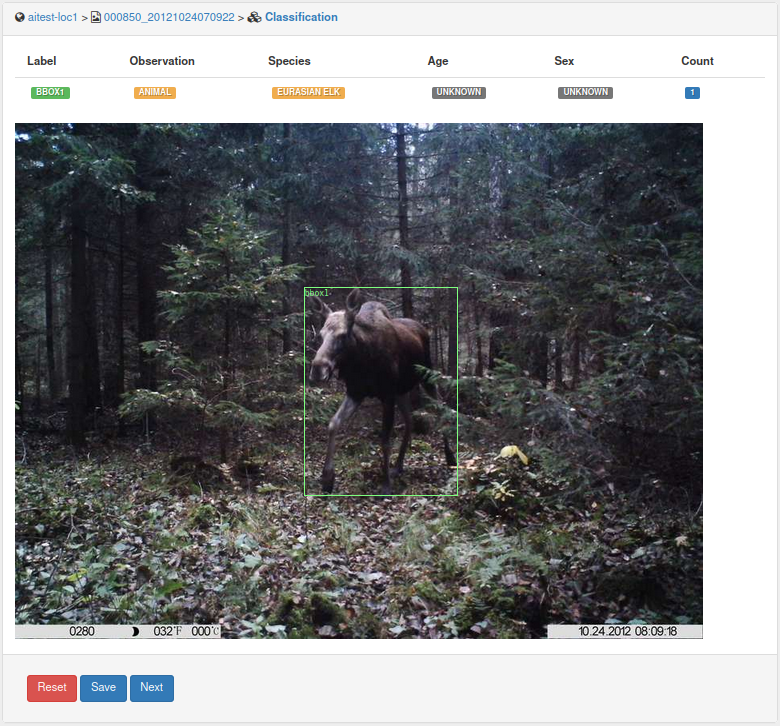
Click ‘Save’ to add the bounding box to the classification. You can see the saved bounding boxes in the classification screen.
Dual Annotation Interfaces in TRAPPER
TRAPPER provides two different interfaces for image annotation and classification, each designed for different use cases and user types:
Expert Interface vs. Citizen Science Frontend
Expert Interface (Classic)
The expert interface provides comprehensive access to all TRAPPER features and is designed for:
Researchers and experienced users who need full control over classification parameters
Projects requiring detailed metadata capture and complex annotation workflows
Administrative tasks and advanced project management
Users who need access to all classificator attributes and advanced features
Access the expert interface through the main TRAPPER web application at your server’s URL.
Citizen Science Frontend
The citizen science frontend offers a streamlined, user-friendly interface designed for:
Volunteer contributors and citizen scientists
Large-scale data annotation projects requiring many participants
Projects where ease of use is prioritized over feature completeness
Training new users before transitioning to the expert interface
The citizen science frontend simplifies the classification process while maintaining data quality and compatibility with the main TRAPPER system.
Choosing the Right Interface
Use the expert interface for detailed research work, administrative tasks, and when you need access to all features
Use the citizen science frontend for volunteer annotation projects, training sessions, and when prioritizing ease of use
Both interfaces work with the same underlying data, so you can use them interchangeably based on your needs
Data Compatibility
Classifications and annotations created in either interface are fully compatible and can be viewed and edited in both systems. This allows for flexible workflows where initial classifications might be done in the citizen science frontend and later refined in the expert interface.
Camtrap DP Data Export
TRAPPER provides comprehensive support for exporting data in the Camera Trap Data Package (Camtrap DP) format, which is the TDWG standard for camera trap data exchange. This functionality allows you to export your TRAPPER data for analysis, archival, or sharing with other researchers and platforms.
What is Camtrap DP?
Camtrap DP is a standardized data format developed by the Biodiversity Information Standards (TDWG) organization specifically for camera trap data. It ensures that camera trap datasets can be easily shared, compared, and analyzed across different platforms and research groups.
The format includes:
Structured metadata about deployments, locations, and media files
Standardized observation and annotation data
Taxonomic information aligned with standard biodiversity databases
Comprehensive project and dataset documentation
For more information, see the official Camtrap DP documentation.
Exporting Data from TRAPPER
Export via Web Interface
Navigate to your classification project details view in TRAPPER and click the Export results button:
https://{your-server}/media_classification/project/detail/{project_id}/
Or navigate directly to the export page:
https://{your-server}/media_classification/classification/export/{project_id}/
Fill in the export options form:

Configure your Camtrap DP package
Generated Files
The export process creates a complete Camtrap DP package containing:
datapackage.json: Main package descriptor with metadatadeployments.csv: Deployment information (when, where cameras were active)media.csv: Media file information and metadataobservations.csv: Classification and observation data
Camtrap DP API for Data Package Generation
TRAPPER provides a REST API for programmatically generating Camtrap DP data packages. This API is particularly useful for automated workflows, large-scale data processing, and integration with external analysis tools.
API Endpoint
Generate and Download Camtrap DP Package
GET /api/media-classifications/package/{project_id}/?parameter=value
Authorization: Token your-api-token
The API uses a single GET endpoint that generates the package (or returns a cached version) and provides a download URL in the response.
API Parameters
All parameters are passed as query parameters in the URL:
Package Generation Options:
clear_cache: Boolean, force regeneration of cached package (default: false)release: Boolean, create a released version of the package (default: false)get_released: Boolean, retrieve the released version if available (default: false)export_format: Export format, only “camtrapdp” is supported (default: “camtrapdp”)export_filetype: File compression type (default: “csv.gz”)
Data Filtering Options:
approved_only: Boolean, include only approved classifications (default: true)exclude_blank: Boolean, exclude blank/empty observations (default: false)all_deployments: Boolean, include all deployments in project (default: true)filter_deployments: String, comma-separated list of deployment IDs to includeinclude_events: Boolean, include event-level data aggregation (default: false)events_count_var: String, variable to use for event counting (default: “count”)
Privacy and Access Options:
private_human: Boolean, apply privacy settings to human observations (default: true)private_vehicle: Boolean, apply privacy settings to vehicle observations (default: true)private_species: List of species names to apply privacy settings totrapper_url_token: Boolean, include TRAPPER-specific URL tokens (default: true)
Package Metadata:
name: String, custom name for the data packageversion: String, version identifier for the package (default: “1.0”)title: String, human-readable title for the packagedescription: String, description of the package contentskeywords: Comma-separated list of keywords for the packagelicenses: Comma-separated list of license identifiers
Authentication
API access requires authentication using API tokens:
Log in to TRAPPER web interface
Go to User Profile > API Tokens
Generate a new API token
Include the token in the
Authorizationheader:Token your-api-token
Response Format
The API returns a JSON response with the following structure:
{
    "data": {
        "message": "Package successfully generated and saved to cache.",
        "errors": null,
        "package": "https://{your-server}/storage/packages/download/{package_id}/"
    }
}
Example Usage
Python Example
import requests

# Configuration
BASE_URL = "https://your-trapper-instance.org"
API_TOKEN = "your-api-token"
PROJECT_ID = 123

headers = {"Authorization": f"Token {API_TOKEN}"}

# Request package generation with custom parameters
params = {
    "approved_only": "true",
    "exclude_blank": "true",
    "clear_cache": "false",
    "export_format": "camtrapdp",
    "name": "wildlife_survey_2024",
    "version": "2.0",
    "title": "Wildlife Survey Data 2024",
    "description": "Camera trap data from forest monitoring project"
}

response = requests.get(
    f"{BASE_URL}/api/media-classifications/package/{PROJECT_ID}/",
    headers=headers,
    params=params
)

if response.status_code == 200:
    result = response.json()
    download_url = result["data"]["package"]
    print(f"Package ready: {download_url}")

    # Download the package
    package_response = requests.get(download_url, headers=headers)
    with open("camtrap_dp_export.zip", "wb") as f:
        f.write(package_response.content)
else:
    print(f"Error: {response.status_code}")
    print(response.json())
R Example
library(httr2)
library(jsonlite)

# Configuration
base_url <- "https://your-trapper-instance.org"
api_token <- "your-api-token"
project_id <- 123

# Request package with parameters
response <- request(paste0(base_url, "/api/media-classifications/package/", project_id, "/")) |>
    req_headers(Authorization = paste("Token", api_token)) |>
    req_url_query(
        approved_only = "true",
        exclude_blank = "true",
        export_format = "camtrapdp",
        name = "wildlife_survey_2024",
        title = "Wildlife Survey Data 2024"
    ) |>
    req_perform()

if (resp_status(response) == 200) {
    result <- resp_body_json(response)
    download_url <- result$data$package

    # Download the package
    request(download_url) |>
        req_headers(Authorization = paste("Token", api_token)) |>
        req_perform(path = "camtrap_dp_export.zip")

    cat("Package downloaded successfully\n")
} else {
    cat("Error:", resp_status(response), "\n")
    cat(resp_body_string(response), "\n")
}
cURL Example
# Generate and get download URL
curl -H "Authorization: Token your-api-token" \
     "https://your-trapper-instance.org/api/media-classifications/package/123/?approved_only=true&name=my_survey"

# Download the package (using URL from response)
curl -H "Authorization: Token your-api-token" \
     -o camtrap_export.zip \
     "https://your-trapper-instance.org/storage/packages/download/package_id/"
Caching and Performance
Automatic Caching
The API automatically caches generated packages to improve performance:
Identical requests return cached results unless
clear_cache=trueis specifiedCached packages are stored server-side and accessible via download URLs
Cache duration is managed automatically by the server
Performance Considerations
Large classification projects may take several minutes to process initially
Subsequent requests for the same parameters return cached results immediately
Use
approved_only=trueto reduce package size and processing timeFilter deployments using
filter_deploymentsparameter to limit scope
Error Handling
The API returns standard HTTP status codes:
200 OK: Package generated successfully or returned from cache400 Bad Request: Invalid parameters or package generation failed401 Unauthorized: Invalid or missing API token403 Forbidden: Insufficient permissions to access the classification project404 Not Found: Classification project not found
Error responses include details in the JSON response:
{
    "data": {
        "message": "Bad request",
        "errors": "Invalid parameter: export_format must be 'camtrapdp'",
        "package": null
    }
}
Common Issues
Permission Errors
Ensure your API token has access to the specified classification project.
Empty Packages
If the generated package contains no data:
Check that the project has approved classifications (if using
approved_only=true)Verify that deployments contain classified resources
Ensure filter parameters are not excluding all data
Large Package Timeouts
For very large projects:
Use
filter_deploymentsto process data in smaller batchesConsider using
exclude_blank=trueto reduce package sizeContact your TRAPPER administrator about server timeout settings
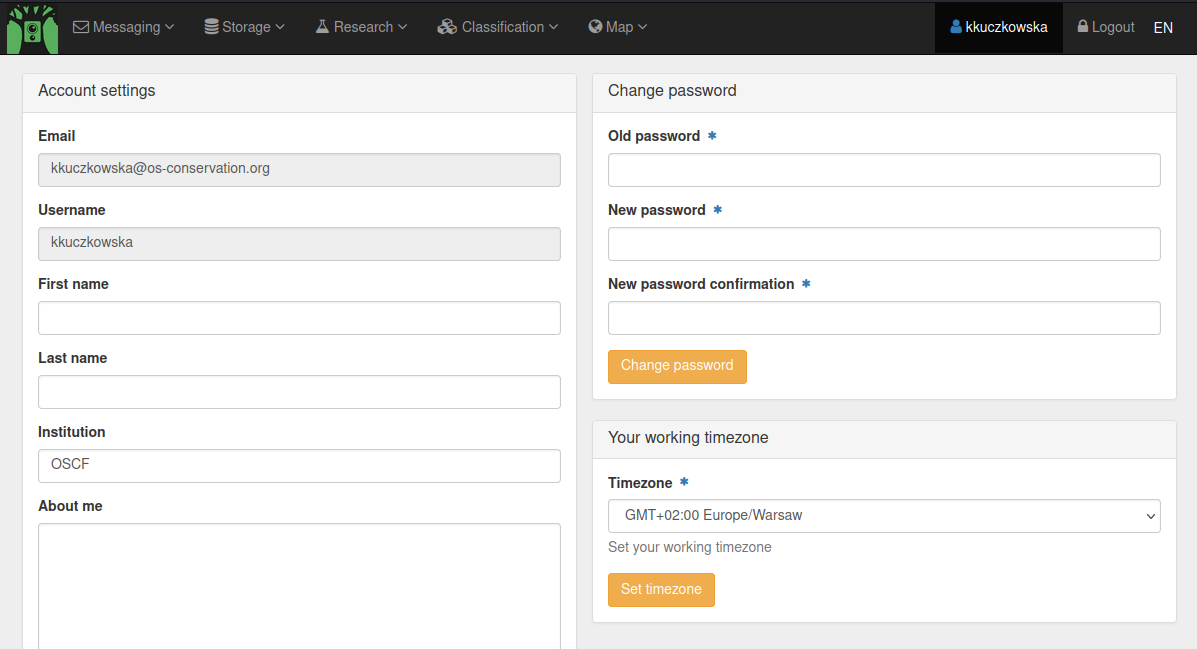
Timezone behaviour in TRAPPER
The default timezone for TRAPPER app is Europe/Warsaw. You can set your working timezone in your User Profile settings tab (click your username in top right corner to access this view).
Your working timezone will be used:
to correctly display system notifications (e.g. asynchronous task completion times on your dashboard),
as a default timezone value in forms.
Daylight Savings Time
While not recommended, it is possible to bypass default behaviour regarding DST (Daylight Saving Time).
If your camera trap at a given location does not use DST (i.e. does not move its timer one hour forward in the
spring and one hour back in the fall), you should mark its ignore_DST flag True.
With that setting, all timestamps in recorded metadata from that location (Deployment.start_date, Deployment.end_date and
Resource.date_recorded) will be processed ignoring DST (it would be considered in processing timestamps otherwise).
Note
Whenever this documentation mentions two Locations having the same timezone specification, it means both the
timezone field and the ignore_DST flag having the same value, as only both values together correctly describe the logic of processing timestamps (i.e. datetime objects) in TRAPPER.
Timezone is set for Location
Location objects have a timezone field and an ignore_DST flag. You have to specify them in the form when adding location in one of the following ways:
using the map view with the form for adding a single location,
importing locations from CSV or GPX file (bulk import),
creating locations automatically using deployments bulk import.
It is very important to correctly set timezone information for every Location, because this data is used to process timestamps in all Deployments and Resources connected to given Location.
Timezone behaviour during CSV import
When importing Deployments or Locations from CSV file, you have to provide their timezone and ignore_DST values in the import forms.
This means that you can only import locations from the same timezone and with the same ignore_DST flag value. Data that do not meet this condition has to be imported using separate CSV files.
When importing Locations, values from the form will be set for all imported objects.
When importing Deployments, they can be linked to different locations, but all locations need to have the same timezone specification. If locations are being created, their timezone info will be set to data from the form.
If Deployments are uploaded to existing Locations, the file will be validated to make sure all locations referenced in the data have the same timezone specification as in the form.
This also applies to uploading Collections - when using trapper-tools, Collections can only be created from Resources linked to Locations with the same timezone specification. The timezone specification is provided in the YAML file describing given Collection. When uploading a Collection, the validation process is performed to check that provided timezone matches Locations in the database as well.
AI Provider and Classification Project Configuration
TRAPPER provides sophisticated artificial intelligence integration through AI Providers and Classification Projects that can leverage machine learning models for automated image analysis. This functionality is particularly useful for processing large datasets and providing initial classifications that can be reviewed and refined by human annotators.
Overview
AI Providers in TRAPPER are configurable services that provide automated image analysis capabilities:
Empty Image Detection: Filtering out images that contain no objects of interest
Object Detection: Identifying and localizing animals, humans, and vehicles in images
Species Classification: Automatically identifying species based on image content
Configuration
TrapperAI Providers are configured by administrators through the Django admin interface and can be associated with Classification Projects to provide automated assistance during annotation.
Trapper AI currently supports multiple deep learning architectures (including Darknet, YOLOR, YOLOv5, YOLOv8, YOLOv9, YOLOv10, YOLOv11, RT-DETR, and ViT). Available AI models include:
MegaDetector v5: General-purpose camera trap object detection; LINK
MegaDetector v6 (PyTorch Wildlife): General-purpose camera trap object detection; LINK
DeepFaune v1.2/v1.3: European mammal species classification; LINK
TRAPPER AI Species Classifier v02.2024/v08.2024: European mammal species classification; LINK
See also
For detailed TrapperAI Provider configuration instructions, see Administration → TrapperAI Provider Configuration. For environment variables and system settings, see Configuration → AI Pipeline Configuration.
Automatic AI Pipeline Workflow
TRAPPER features a sophisticated automatic AI pipeline that can process uploaded camera trap images through multiple stages of machine learning analysis. This pipeline streamlines the annotation process by automatically detecting objects, classifying species, building sequences, and applying privacy filters.
Pipeline Overview
The AI pipeline consists of four sequential stages that are automatically triggered when new collections are uploaded to classification projects with AI processing enabled:
Sequence Building: Group related images into meaningful temporal sequences
Object Detection: Identify and locate animals, humans, and vehicles in images
Privacy Blurring: Automatically blur human faces and vehicle license plates
Species Classification: Classify detected animals to species level
Each stage builds upon the results of the previous stage, creating a comprehensive automated workflow that significantly reduces manual annotation effort.
Using the Pipeline with Trapper-Tools
The most efficient way to utilize the AI pipeline is through the trapper-tools pipeline command, which automates the entire workflow from data preparation to AI processing:
# Complete automated workflow: convert → package → upload → trigger AI processing
trapper-tools pipeline --data-path /path/to/data --convert --trigger
This single command will:
Convert media files to web-friendly formats
Create standardized data packages with metadata
Upload packages securely via FTPS
Trigger automatic AI pipeline processing upon upload
Pipeline Benefits
Automated Processing: Reduces manual annotation effort by 60-80%
Consistent Quality: Applies standardized AI models across all images
Privacy Protection: Automatically protects sensitive content
Scalable: Processes thousands of images efficiently
Quality Control: Provides confidence scores and review workflows
See also
For detailed pipeline configuration, see Configuration → AI Pipeline Configuration. For AI provider setup and monitoring, see Administration → AI Provider and Classification Project Configuration.
How to generate Deployments template
First, ensure your data follows the required directory structure with collections and deployment folders. Then use the helper command to generate a deployment template:
trapper-tools helpers template --data-path /path/to/data
This analyzes your data structure and creates a CSV template with deployment information extracted from your media files. You can then review and edit this CSV file before importing it into TRAPPER via Map > Deployments > Import deployments.
Note
For detailed instructions on Trapper Tools installation, configuration, and advanced usage, see https://gitlab.com/trapper-project/trapper-tools.