Create a classification project
At a glance
Stand up a Classification Project — the schema, AI provider stack, and human annotators that turn uploaded Resources into approved classifications.
- Time: ~20 minutes (quick start); longer for a full AI pipeline setup
- Who: research project owners/managers setting up annotation workflows
- Prerequisites: AI providers registered (optional, only if you want automatic processing)
Before you begin
- A Research Project you own or manage
- At least one Collection with Resources
- AI Providers registered, if you want automatic processing — see Register & sync AI providers
Quick start
The minimum steps to get a working Classification Project where annotators can start classifying resources:
1. Create or pick a Research Project
Research → Research projects, then the + icon. Fill in name, acronym (max 10 characters), and the sampling design fields — see Your first research project for the full field list. Your request goes to an admin for approval; once approved, you're the owner.
2. Add a Collection
A Collection groups Resources, typically one ingestion session. Resources join a Collection at upload time (via trapper-tools or the Citizen Science Upload wizard); there's no admin-UI action to reattach already-uploaded Resources to a different Collection after the fact.
If you need to create an empty Collection ahead of an upload: Storage → Collections → +, set name/owner/status, save. Then link it to your Research Project from the Research Project's edit page (scroll to Research project collections inline at the bottom, add a row).
3. Build a Classificator
Media classification → Classificators → + — see Your first research project for the full step-by-step.
Fastest path if you already have an AI provider
Select the provider's row on the Media classification → Ai providers changelist and run the Create Classificator from AI Provider species mapping action — the resulting Classificator has the species list pre-populated.
4. Create the Classification Project
Media classification → Classification projects → +, fill in at minimum:
- Name and Research project
- Classificator (from step 3)
- Owner (typically yourself)
Set the AI models if you want automatic processing (see AI Models below). Save.
5. Attach collections and build sequences
A Classification Project does not have a direct Collections field in its own form — instead, create a separate Classification projects collection row linking the two: Media classification → Classification projects collections → +, pick Project + Collection.
Then, from that same page's action dropdown, run (Re)build sequences for selected collections — without this step the classify view cannot step through bursts of resources.
See Your first research project, step 7.
6. Assign annotators
On the Classification Project's edit page, two inline tables at the bottom handle this:
- Project roles (Admin / Expert / Collaborator) — pick a user and a role from those three.
- Citizen Science members — pick a user who should see this project in the Citizen Science frontend.
For bulk role assignment, use the Set roles for selected users admin action — see Users & roles.
Verify it worked
Open the project page in the Citizen Science frontend (or the Expert classify view). You should see the attached collections with counts, AI Classifications populated on resources once the pipeline finishes (watch Flower at http://localhost:5555), and the classification form rendered with your Classificator's fields.
Advanced configuration
The admin edit page (/admin/media_classification/classificationproject/<id>/change/) is divided into the following sections.
Basic fields
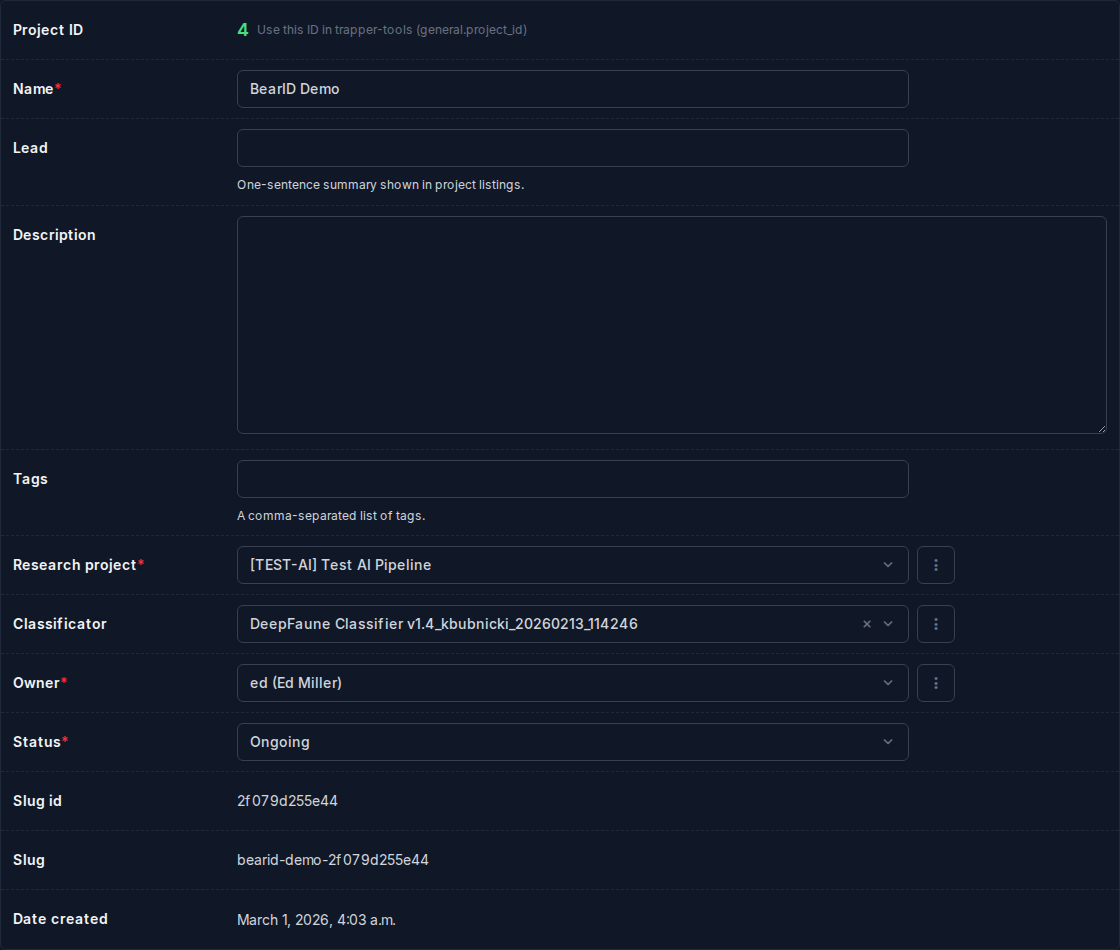
| Field | What it does |
|---|---|
| Name | Display name for the project |
| Lead | One-sentence summary shown in project listings |
| Description | Rich-text description (max 2000 chars) |
| Keywords | Tags for search/filtering |
| Research project | Parent research project (required) |
| Classificator | The attribute schema annotators fill in (required) |
| Owner | The user who administers this project |
| Status | Ongoing / Finished |
AI Models
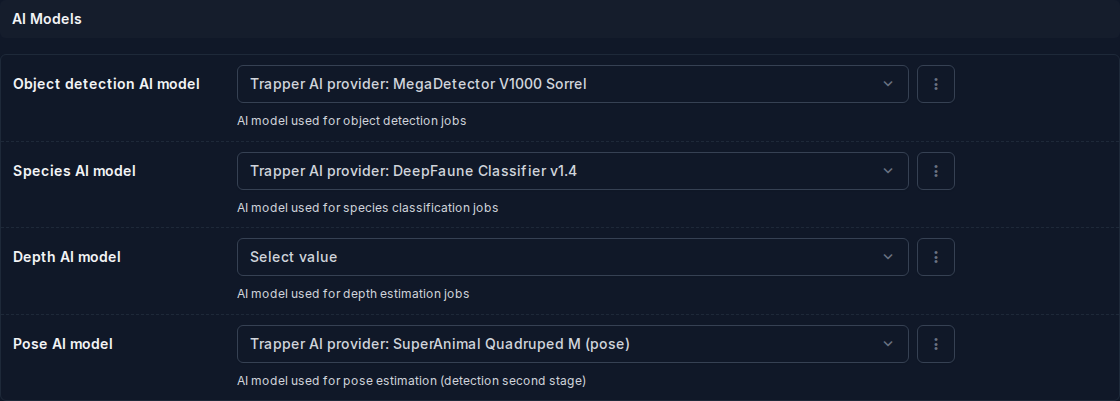
Four FK dropdowns — each is filtered to show only providers of the matching provider_type:
| Field | Provider type | What it does |
|---|---|---|
| Object detection AI model | detection |
Locates objects (animals, humans, vehicles) and draws bounding boxes |
| Species AI model | classification |
Classifies each detected bounding box to a species (or observation type) |
| Depth AI model | depth |
Monocular depth model used by both the distance_calibration and distance_estimation jobs |
| Pose AI model | pose |
Keypoint estimation for body-pose annotation — runs as a second stage inside the detection job |
Note
Assigning a model here does not trigger any jobs on its own. Jobs are triggered via Run & re-run the AI pipeline. If a model is not yet registered, see Register & sync AI providers.
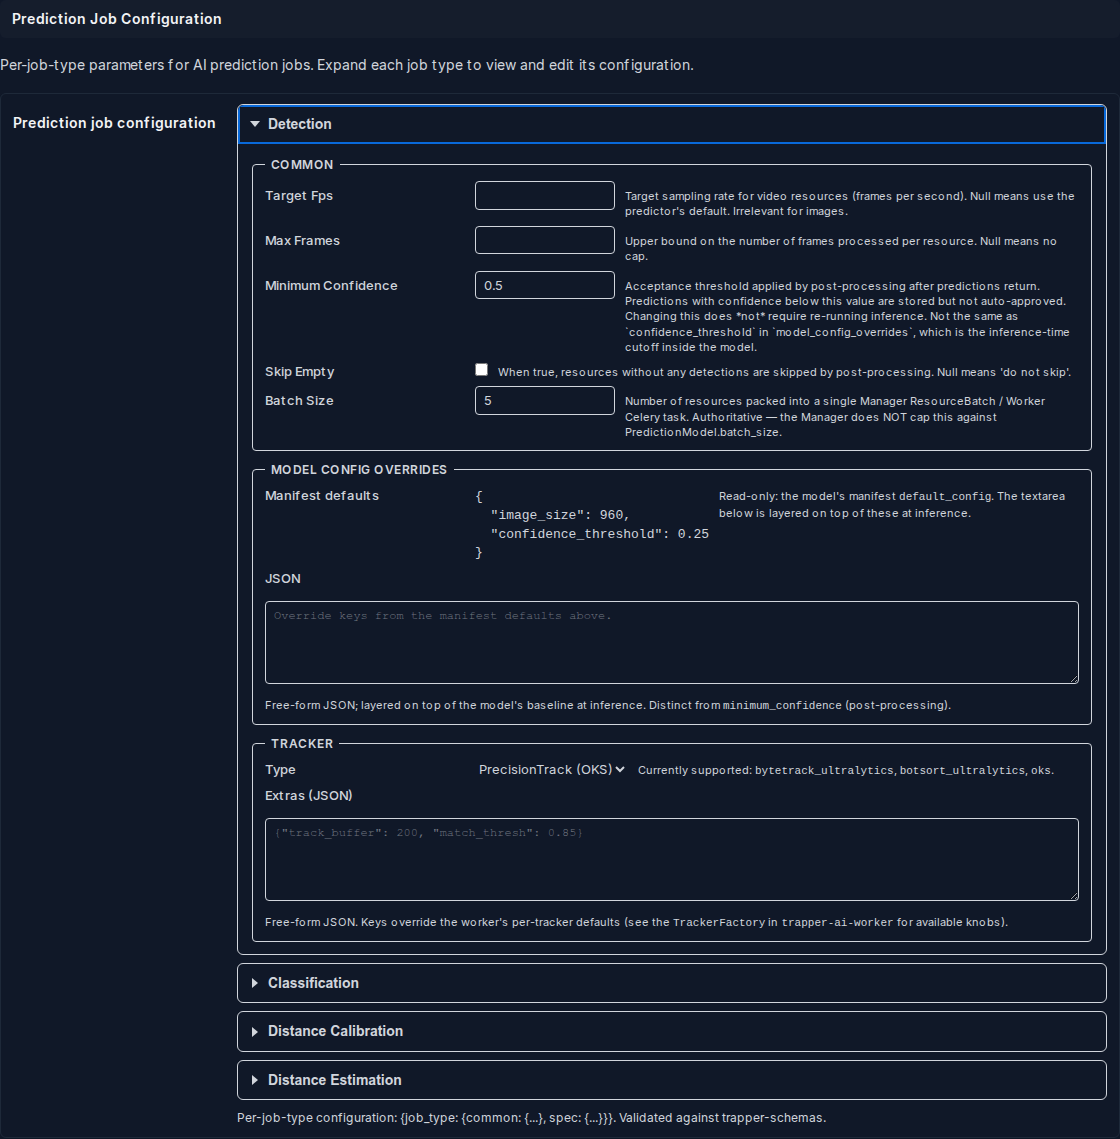
Prediction Job Configuration
Authoritative source for defaults
The field defaults quoted in the spec tables below (e.g. min_confirmations, distance_percentile, sam_weights) live in the trapper-schemas package, pinned at v0.5.0. That pin is the source of truth — if a value here disagrees with the schema, trust the schema. These tables document a snapshot; they aren't regenerated automatically, so re-check them against the pinned schema after a schema bump.
This is the main AI tuning section. It renders as a set of expandable accordion panels — one per job type (Detection, Classification, Distance Calibration, Distance Estimation). Each panel is collapsed by default; click the header to expand.
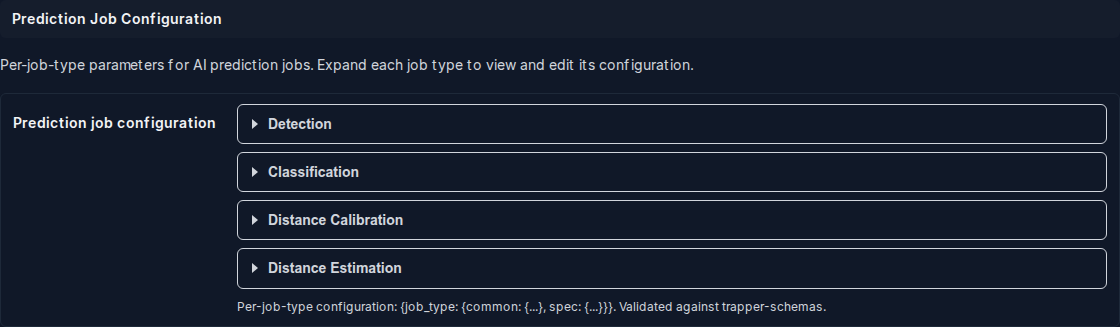
The configuration is stored as a single JSON field (prediction_config) shaped:
{
  "detection": {
    "common": { ... },
    "spec": { ... },
    "model_config_overrides": { ... }
  },
  "classification": { ... },
  "distance_calibration": { ... },
  "distance_estimation": { ... }
}
Only job types you explicitly configure are stored — the rest use worker defaults.
Common fields (all job types)
These fields appear in every job type panel under the Common section:
| Field | Type | Default | What it does |
|---|---|---|---|
target_fps |
int or blank | worker default | Target sampling rate for video resources (frames/s). Blank means use the predictor's own default. Has no effect on image-only projects. |
max_frames |
int or blank | no cap | Upper bound on frames processed per resource. Useful to limit cost on very long videos. |
minimum_confidence |
float [0–1] or blank | worker default | Post-processing acceptance threshold. Predictions below this value are stored but not auto-approved. Not the same as confidence_threshold in Model Config Overrides, which is the inference-time cutoff inside the model. |
skip_empty |
checkbox | false | When enabled, resources with no detections are skipped by post-processing (never appear in the classify queue). |
batch_size |
int or blank | 30 | Number of resources packed into a single Manager ResourceBatch / Worker Celery task. This value is authoritative — the Manager does not cap it against the model's own batch_size — so set it lower if you see memory pressure from large batches queued together. |
Detection
The Detection panel has one additional sub-section: Tracker.
Tracker controls which multi-object tracker is applied to stitch per-frame bounding boxes into continuous object tracks across video frames:
| Field | What it does |
|---|---|
| Tracker type | Dropdown: ByteTrack, BoT-SORT, PrecisionTrack (OKS). Leave blank to use the worker's built-in default. |
| Extras (JSON) | Free-form JSON dict of tracker-specific advanced options passed through to the tracker at runtime. Leave blank unless you know the tracker's internal parameter names. |
Spec — Settings:
| Field | Type | Default | What it does |
|---|---|---|---|
detection_batch_size |
int | 1 | Number of frames/images detected per GPU batch (one forward pass). Also bounds the image-download prefetch window and the video frame-loop flush size. 1 preserves per-frame behaviour; raise it for GPU throughput at the cost of VRAM. |
This is the only user-editable DetectionSpec field — the schema's pose_model_id and ship_keypoints fields are driven by the project's pose-model assignment, not by this form.
Model Config Overrides — see Model Config Overrides below.
Classification
The Classification panel has one additional sub-section: Majority Voting.
Majority Voting controls how many frames must confirm a detection before the tracker promotes it to a stable classification:
| Field | Type | Default | What it does |
|---|---|---|---|
min_confirmations |
int | 30 | Minimum number of frames in which the tracker must observe the detection across the sequence before it is accepted. Higher values reduce false positives from fleeting detections; lower values catch animals that pass quickly. |
Spec — Settings:
| Field | Type | Default | What it does |
|---|---|---|---|
classification_batch_size |
int | 4 | Number of crop samples sent to the species model per inference batch. Increase for faster throughput on a powerful GPU; decrease if you hit VRAM limits. |
skip_missing_labels |
checkbox | off | When enabled, species predictions whose label has no mapping in the project's species table are silently ignored instead of failing the job. Useful when an AI model has a wider species vocabulary than the project's Classificator. |
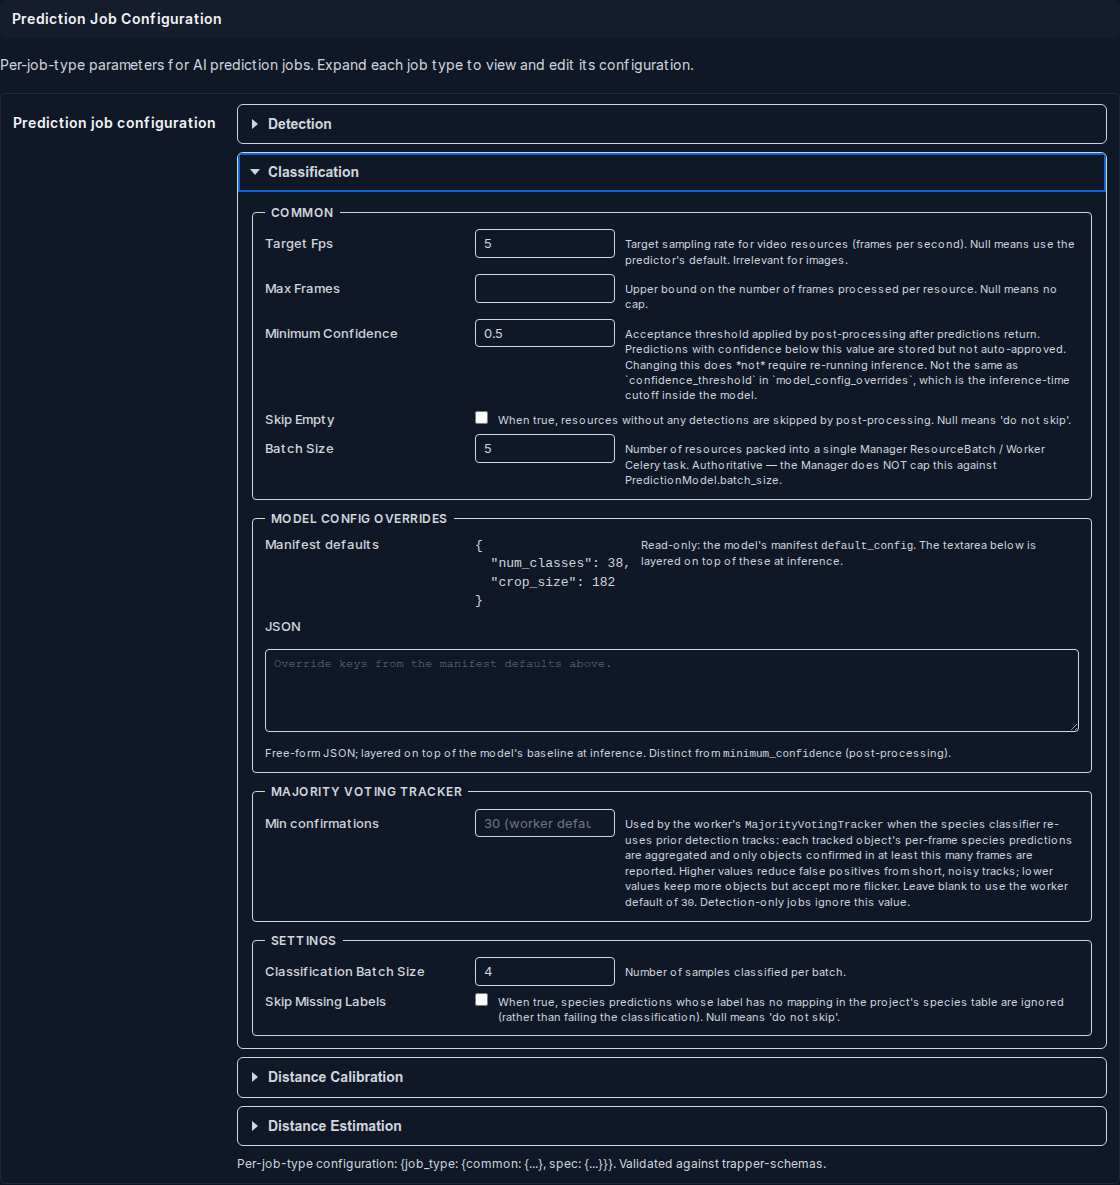
Model Config Overrides — see Model Config Overrides below.
Distance Calibration
Calibration fits an affine or piecewise-linear mapping from the depth model's raw output (relative inverse depth) to real-world metres, using reference points you provide on a set of calibration images. See Distance estimation for the full workflow.
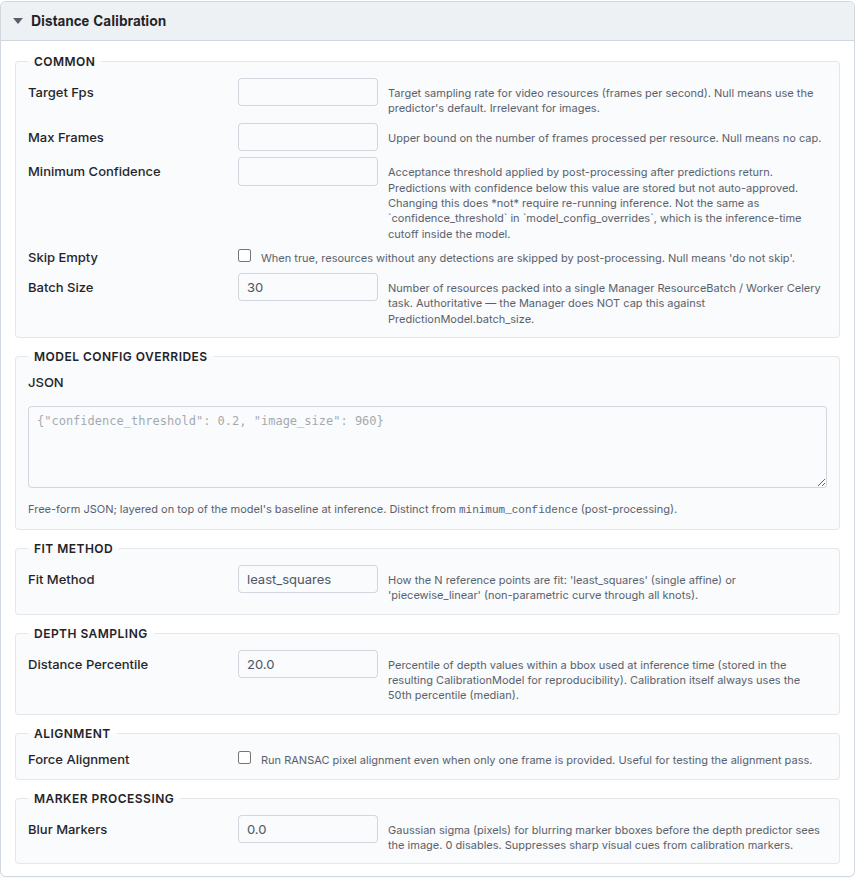
Spec — Fit Method:
| Field | Type | Default | What it does |
|---|---|---|---|
fit_method |
string | least_squares |
How reference points are fitted: least_squares (single affine transform — fast, works well when depth is approximately linear) or piecewise_linear (non-parametric curve through all knots — handles non-linear depth response at the cost of more calibration images). |
Spec — Depth Sampling:
| Field | Type | Default | What it does |
|---|---|---|---|
distance_percentile |
float [0–100] | 20.0 | Percentile of depth values sampled within each bounding box when estimating the object's distance at inference time. The 20th percentile (foreground bias) is the Haucke et al. default. Calibration itself always uses the 50th percentile (median). |
Spec — Alignment:
| Field | Type | Default | What it does |
|---|---|---|---|
force_alignment |
checkbox | off | Run RANSAC pixel alignment even when only one calibration frame is provided. Useful for testing the alignment pass in isolation. |
Spec — Marker Processing:
| Field | Type | Default | What it does |
|---|---|---|---|
blur_markers |
float | 0.0 | Gaussian sigma (pixels) for blurring calibration marker bounding boxes before the depth predictor sees the image. 0 disables blurring. Suppresses sharp visual cues from physical markers that could bias depth estimates. |
Model Config Overrides — see Model Config Overrides below.
Distance Estimation
Estimation applies the fitted calibration model to every resource in the project, producing a per-frame distance series for each tracked object.
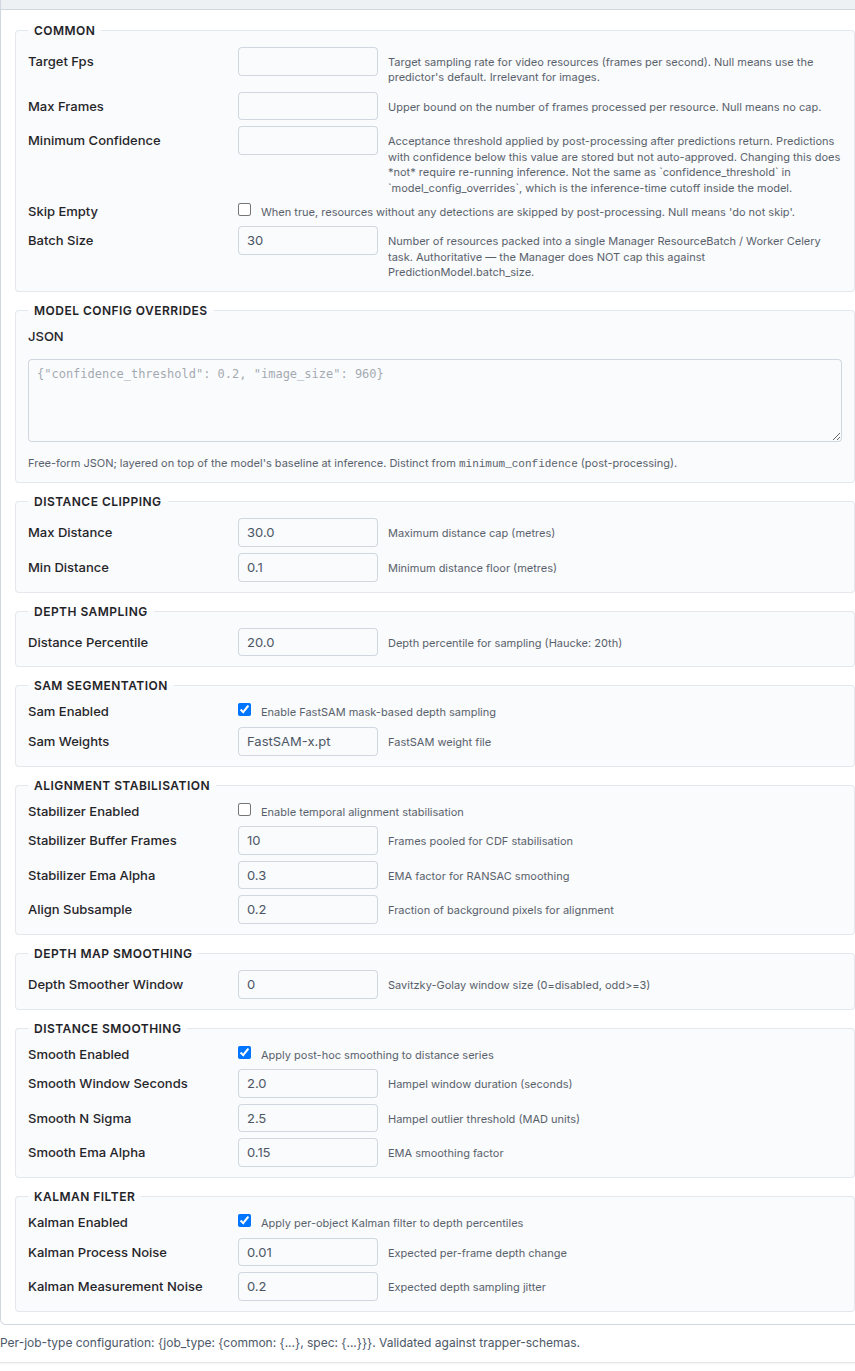
Spec — Distance Clipping:
| Field | Type | Default | What it does |
|---|---|---|---|
max_distance |
float | 30.0 m | Hard cap on output distance. Estimates above this value are clamped. Set to match your camera's realistic detection range. |
min_distance |
float | 0.1 m | Hard floor on output distance. Prevents physically impossible near-zero estimates. |
Spec — Depth Sampling:
| Field | Type | Default | What it does |
|---|---|---|---|
distance_percentile |
float [0–100] | 20.0 | Same as in calibration: percentile of depth values within each bbox used to estimate the object's distance per frame. Must match the calibration value to keep the mapping consistent. |
Spec — SAM Segmentation:
FastSAM optionally runs a segmentation mask inside each bounding box before depth sampling, improving accuracy by excluding background pixels near the object boundary.
| Field | Type | Default | What it does |
|---|---|---|---|
sam_enabled |
checkbox | on | Enable FastSAM mask-based depth sampling. Recommended — leave on unless you want faster processing at the cost of accuracy. |
sam_weights |
string | FastSAM-x.pt |
FastSAM weight file name. Must be present in the AI Worker's model directory. |
Spec — Alignment Stabilisation:
Temporal RANSAC alignment stabilises the depth map across frames to reduce jitter from camera movement between shots.
| Field | Type | Default | What it does |
|---|---|---|---|
stabilizer_enabled |
checkbox | off | Enable temporal alignment stabilisation. Useful for handheld or slightly repositioned camera setups. |
stabilizer_buffer_frames |
int | 10 | Number of frames pooled for CDF-based stabilisation. |
stabilizer_ema_alpha |
float | 0.3 | EMA (Exponential Moving Average) factor for RANSAC smoothing. |
align_subsample |
float | 0.2 | Fraction of background pixels used for alignment (0–1). Lower values are faster. |
Spec — Depth Map Smoothing:
| Field | Type | Default | What it does |
|---|---|---|---|
depth_smoother_window |
int | 0 | Savitzky-Golay smoothing window applied to raw depth maps across frames. 0 disables. Must be an odd number ≥ 3 when enabled. Smooths noise in the raw depth map before distance sampling. |
Spec — Distance Smoothing (Hampel + EMA):
Post-hoc smoothing applied to the resulting per-frame distance series to remove outliers and smooth rapid jumps.
| Field | Type | Default | What it does |
|---|---|---|---|
smooth_enabled |
checkbox | on | Apply Hampel filter + EMA smoothing to the distance series. Recommended. |
smooth_window_seconds |
float | 2.0 s | Hampel filter window duration in seconds. Frames within this window are used to compute the local median for outlier detection. |
smooth_n_sigma |
float | 2.5 | Hampel outlier threshold in MAD (Median Absolute Deviation) units. Frames whose distance deviates more than n_sigma × MAD from the local median are replaced by the median. |
smooth_ema_alpha |
float | 0.15 | EMA smoothing factor applied after Hampel filtering. Lower values = more smoothing; higher values = faster response to real movement. |
Spec — Kalman Filter:
Per-object Kalman filter applied to depth percentile values to reduce noise in the raw depth signal before distance conversion.
| Field | Type | Default | What it does |
|---|---|---|---|
kalman_enabled |
checkbox | on | Enable per-object Kalman filtering. Recommended. |
kalman_process_noise |
float | 0.01 | Expected per-frame depth change (process noise covariance). Lower = smoother but slower to react to real depth changes. |
kalman_measurement_noise |
float | 0.2 | Expected depth sampling jitter (measurement noise covariance). Higher = trusts measurements less, relies more on the filter. |
Model Config Overrides — see Model Config Overrides below.
Model Config Overrides
Each job type panel has a Model Config Overrides section at the bottom with two parts:
- Manifest defaults (read-only) — the model's
default_configfrom the AI Manager manifest, shown as a reference. For example, a detection model might show{"image_size": 960, "confidence_threshold": 0.25}, and a classifier might show{"num_classes": 38, "crop_size": 182}. These are the values the worker uses unless you override them below. - JSON textarea — a free-form dict layered on top of the manifest defaults at inference time. Only keys you add here are overridden; the rest continue to use the manifest values.
Keys are whatever the predictor accepts, for example:
{
  "confidence_threshold": 0.15,
  "image_size": 1280,
  "iou_threshold": 0.45
}
Two different confidence thresholds
model_config_overrides.confidence_threshold is the inference-time cutoff inside the model — predictions below it are discarded before they even leave the AI Worker. common.minimum_confidence is the post-processing threshold on the Expert side — predictions below it are stored but not auto-approved. The two operate at different stages of the pipeline and can be set independently.
Leave the JSON textarea blank to use the model's own defaults from the manifest unchanged.
Video & Sampling
| Field | Default | What it does |
|---|---|---|
| Video support enabled | off | Accept video resources in this project at all. Must be enabled before video files uploaded to attached collections appear in the classify view. |
target_fps here vs. in Prediction Job Configuration
A field named target_fps exists on a different model — ProjectHypertablePopulation.target_fps — which controls the frame-rate density used when building the analytics hypertable (see Frame hypertable export). It is unrelated to AI inference sampling. The inference target_fps lives in Prediction Job Configuration → Detection / Classification → Common → target_fps.
Confidence Thresholds
Visual-only flags shown in the classify view to alert annotators — they do not block any workflow or change how data is stored.
| Field | Default | What it does |
|---|---|---|
| Observation type confidence warning threshold | 0.7 | AI confidence below this value triggers a visual warning on the observation_type prediction. |
| Species confidence warning threshold | 0.7 | AI confidence below this value triggers a visual warning on the species prediction. |
Citizen Science
Controls how the project and its data appear in the Citizen Science frontend.
| Field | Default | What it does |
|---|---|---|
| Citizen Science status | Not belong | Not belong — hidden from CS; Public project — any CS user can see it; Private project — only members added in the CS members inline can see it. |
| Exclude human observations | off | Hide resources classified as humans from the CS classifications queryset. |
| Exclude blank observations | off | Hide resources classified as blank (no animal) from the CS classifications queryset. |
| Required AI classification | on | Block annotators from classifying a resource until the AI pipeline has processed it. Enable for AI-first workflows where human annotation is only for validation. |
| Image background | — | Optional background image (max 500×300 px) shown on the project card in the CS frontend. |
| Hide classification attributes for non-animals | on | Simplify the classification form — hide species, sex, age etc. when observation_type is not animal. Recommended for most projects. |
Blurring
Automatic blurring of detected humans and vehicles, for privacy compliance.
| Field | Default | What it does |
|---|---|---|
| Blur humans | on | Blur bounding-box regions classified as humans after AI processing. |
| Blur vehicles | on | Blur bounding-box regions classified as vehicles after AI processing. |
| Blur backup | on | Keep an unblurred copy of the original image in protected/storage/.../backup/ before overwriting. Required if you ever need to restore originals. |
| Blur humans and vehicles immediately | off | Apply blurring as soon as the AI pipeline finishes, without waiting for human approval. Irreversible unless Blur backup is enabled. Enable only when GDPR or similar regulations require immediate anonymisation. |
Troubleshooting
AI Classifications never appear
Check: the Object detection / Species AI model fields are set and Is active on both providers; the Classification projects collection row exists and sequences have been built; and the Celery Flower dashboard (http://localhost:5555) for stuck/failed jobs.
Annotators see a blank or wrong classification form
The form is generated from the Classificator's attribute schema — re-check step 3, and confirm the project's Classificator field points at the right one (easy to mix up when a project has several similar Classificators).
Distance estimation results look wrong
Verify distance_percentile in the estimation config matches the value used during calibration. If you changed max_distance / min_distance, re-run estimation — calibration does not need to be re-run for clipping changes alone.